

 ### 2. Load a model to memory
Head over to the **Chat** tab, and
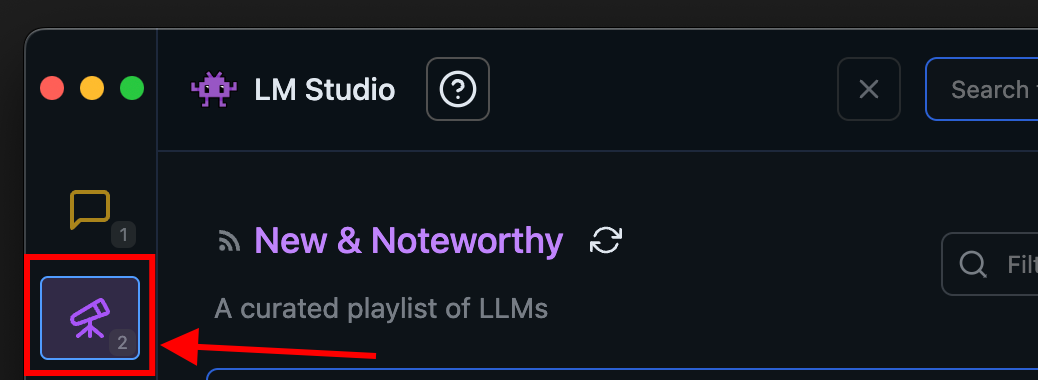
1. Open the model loader
2. Select one of the models you downloaded (or [sideloaded](/docs/advanced/sideload)).
3. Optionally, choose load configuration parameters.
### 2. Load a model to memory
Head over to the **Chat** tab, and
1. Open the model loader
2. Select one of the models you downloaded (or [sideloaded](/docs/advanced/sideload)).
3. Optionally, choose load configuration parameters.
 ##### What does loading a model mean?
Loading a model typically means allocating memory to be able to accommodate the model's weights and other parameters in your computer's RAM.
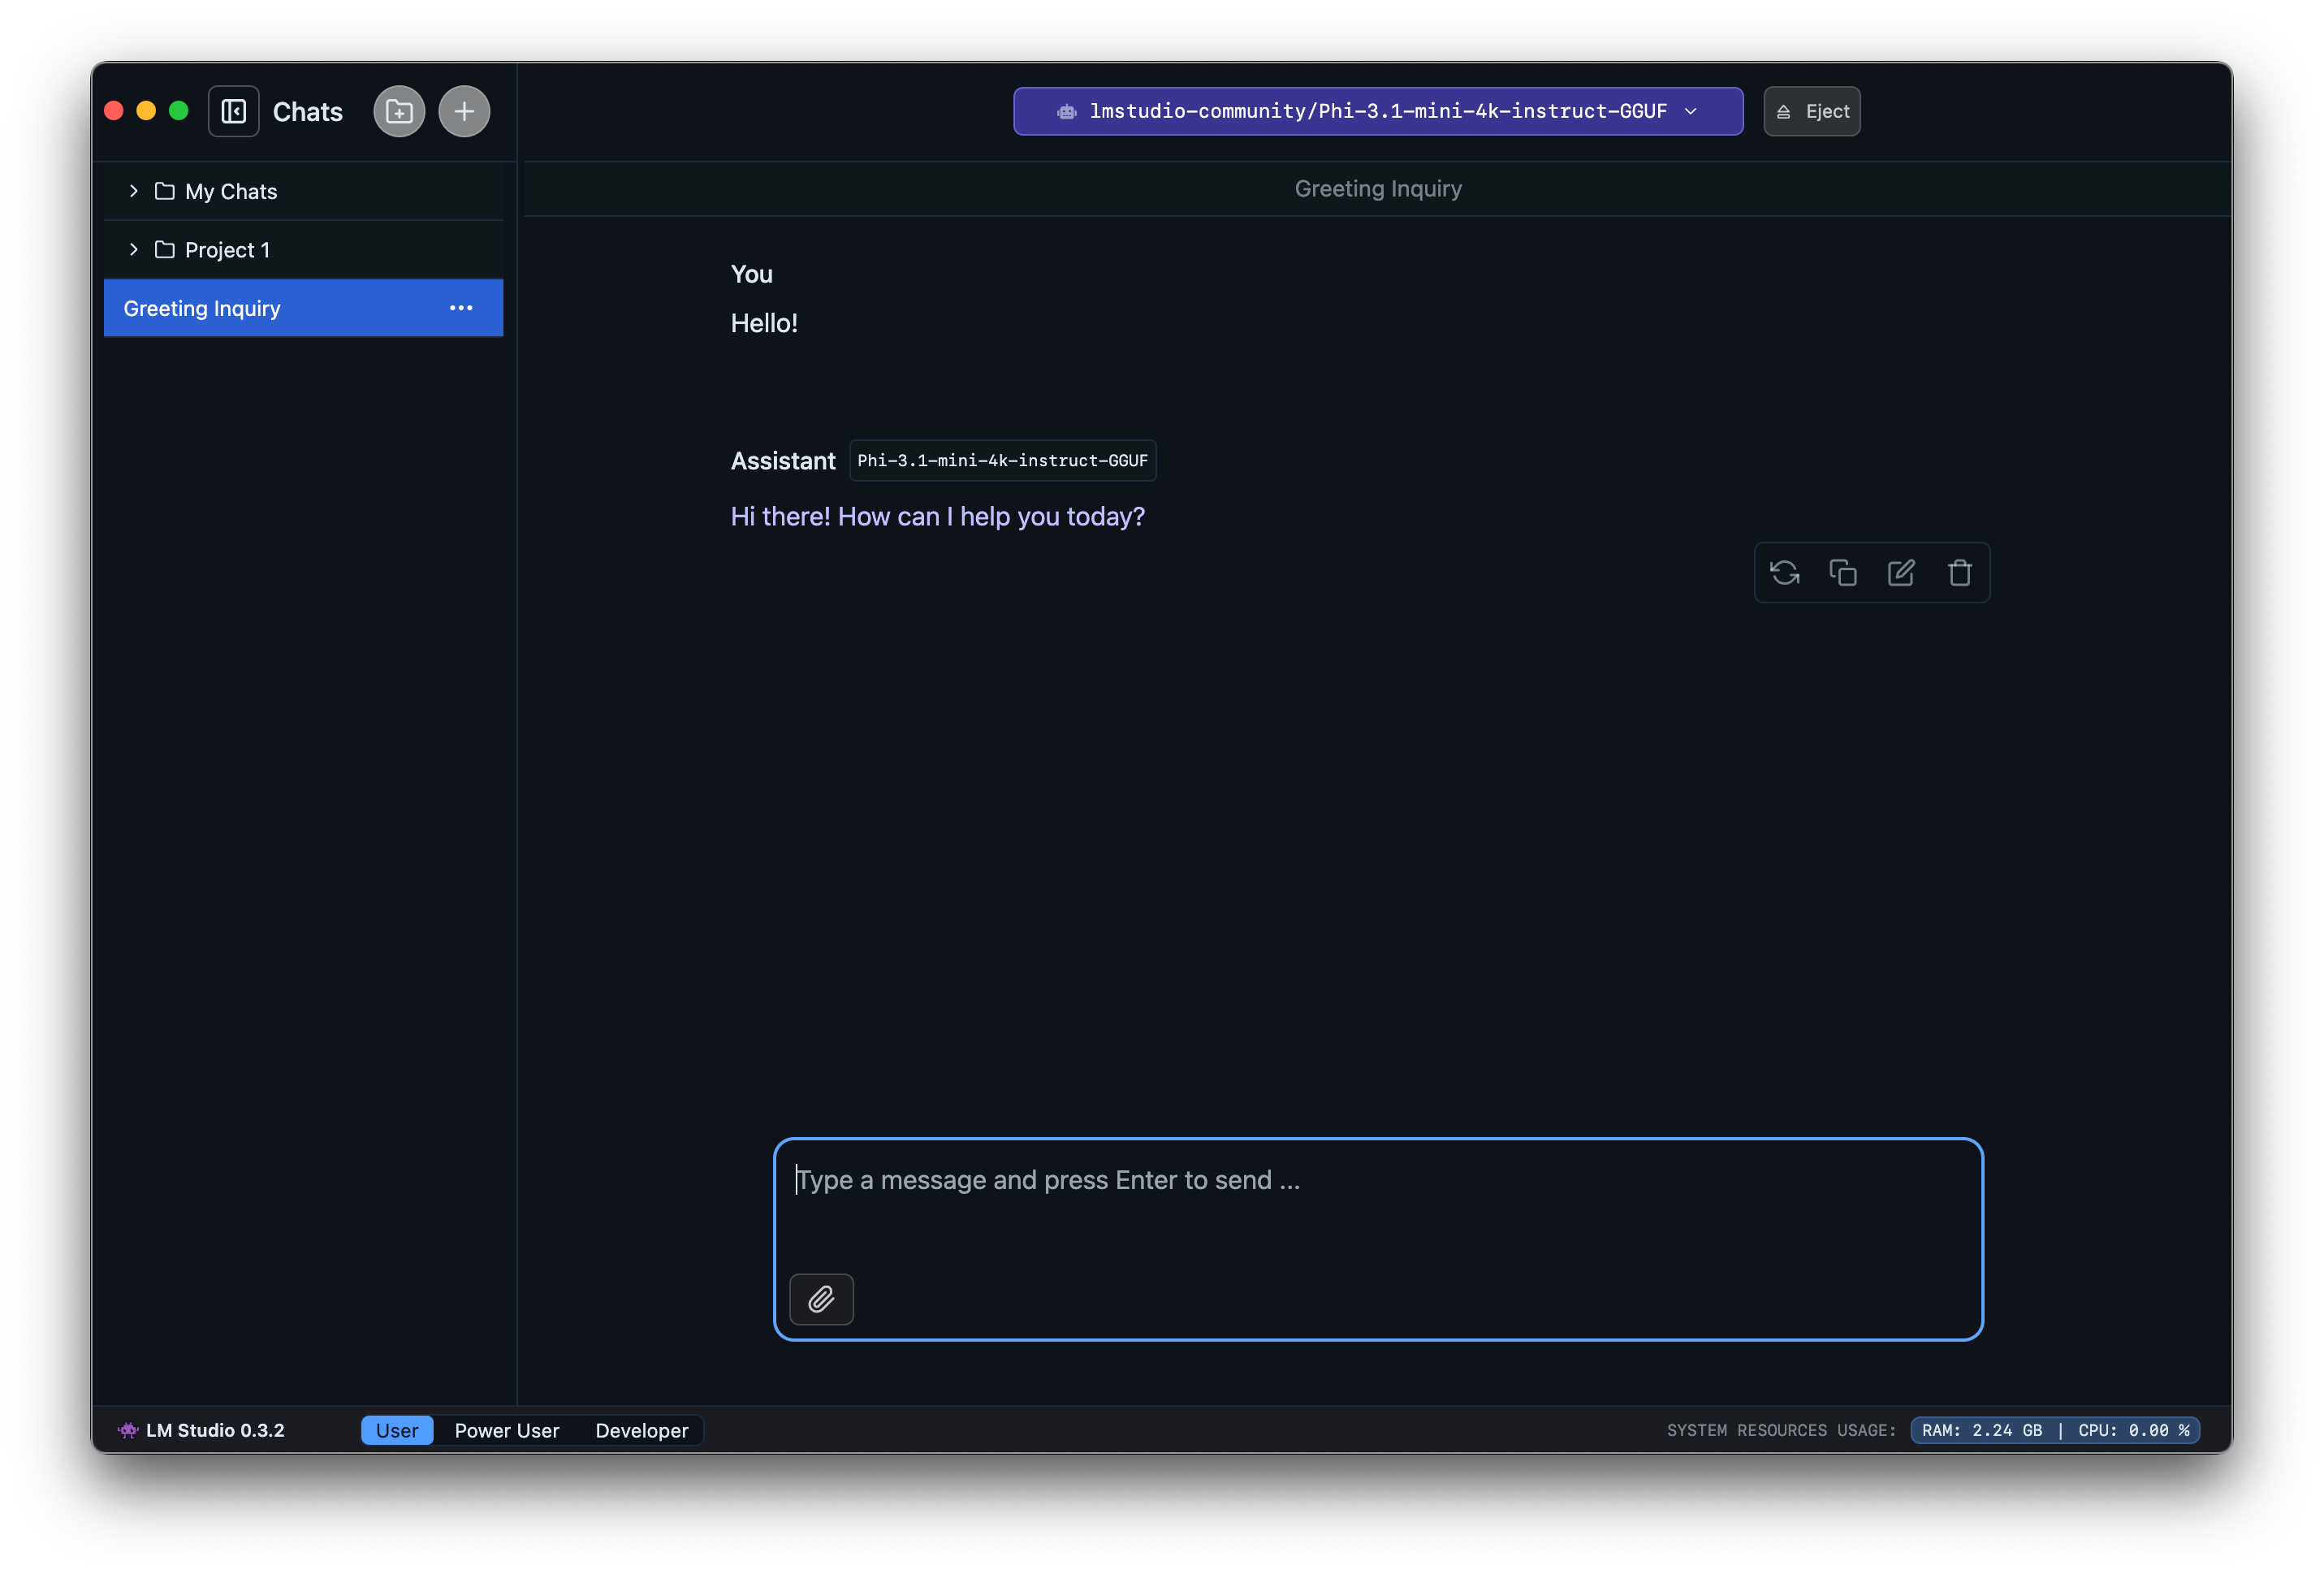
### 3. Chat!
Once the model is loaded, you can start a back-and-forth conversation with the model in the Chat tab.
##### What does loading a model mean?
Loading a model typically means allocating memory to be able to accommodate the model's weights and other parameters in your computer's RAM.
### 3. Chat!
Once the model is loaded, you can start a back-and-forth conversation with the model in the Chat tab.

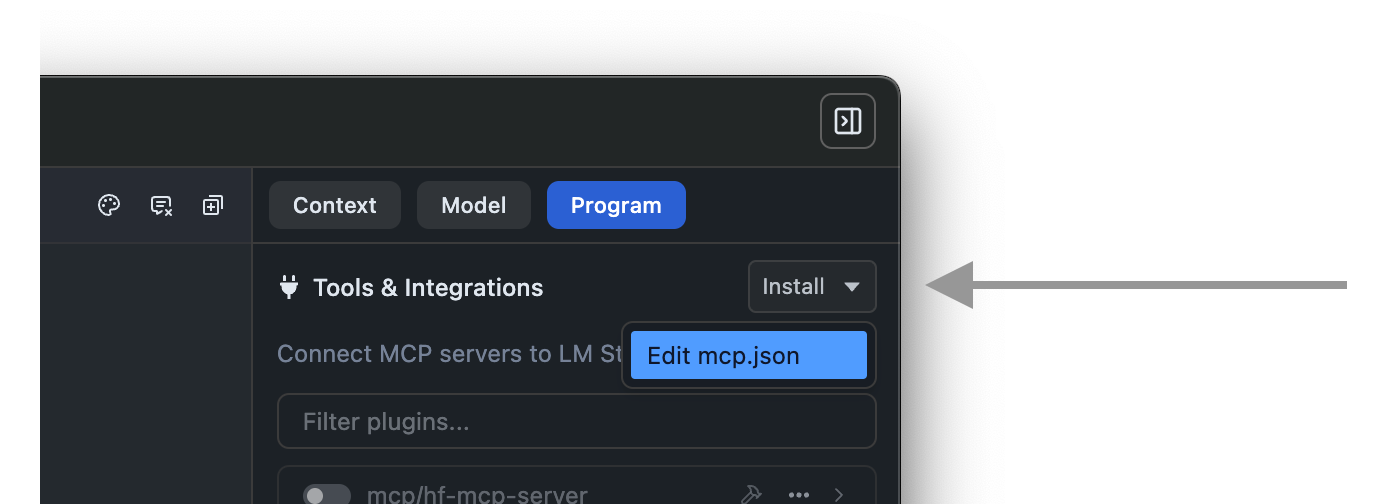 This will open the `mcp.json` file in the in-app editor. You can add MCP servers by editing this file.
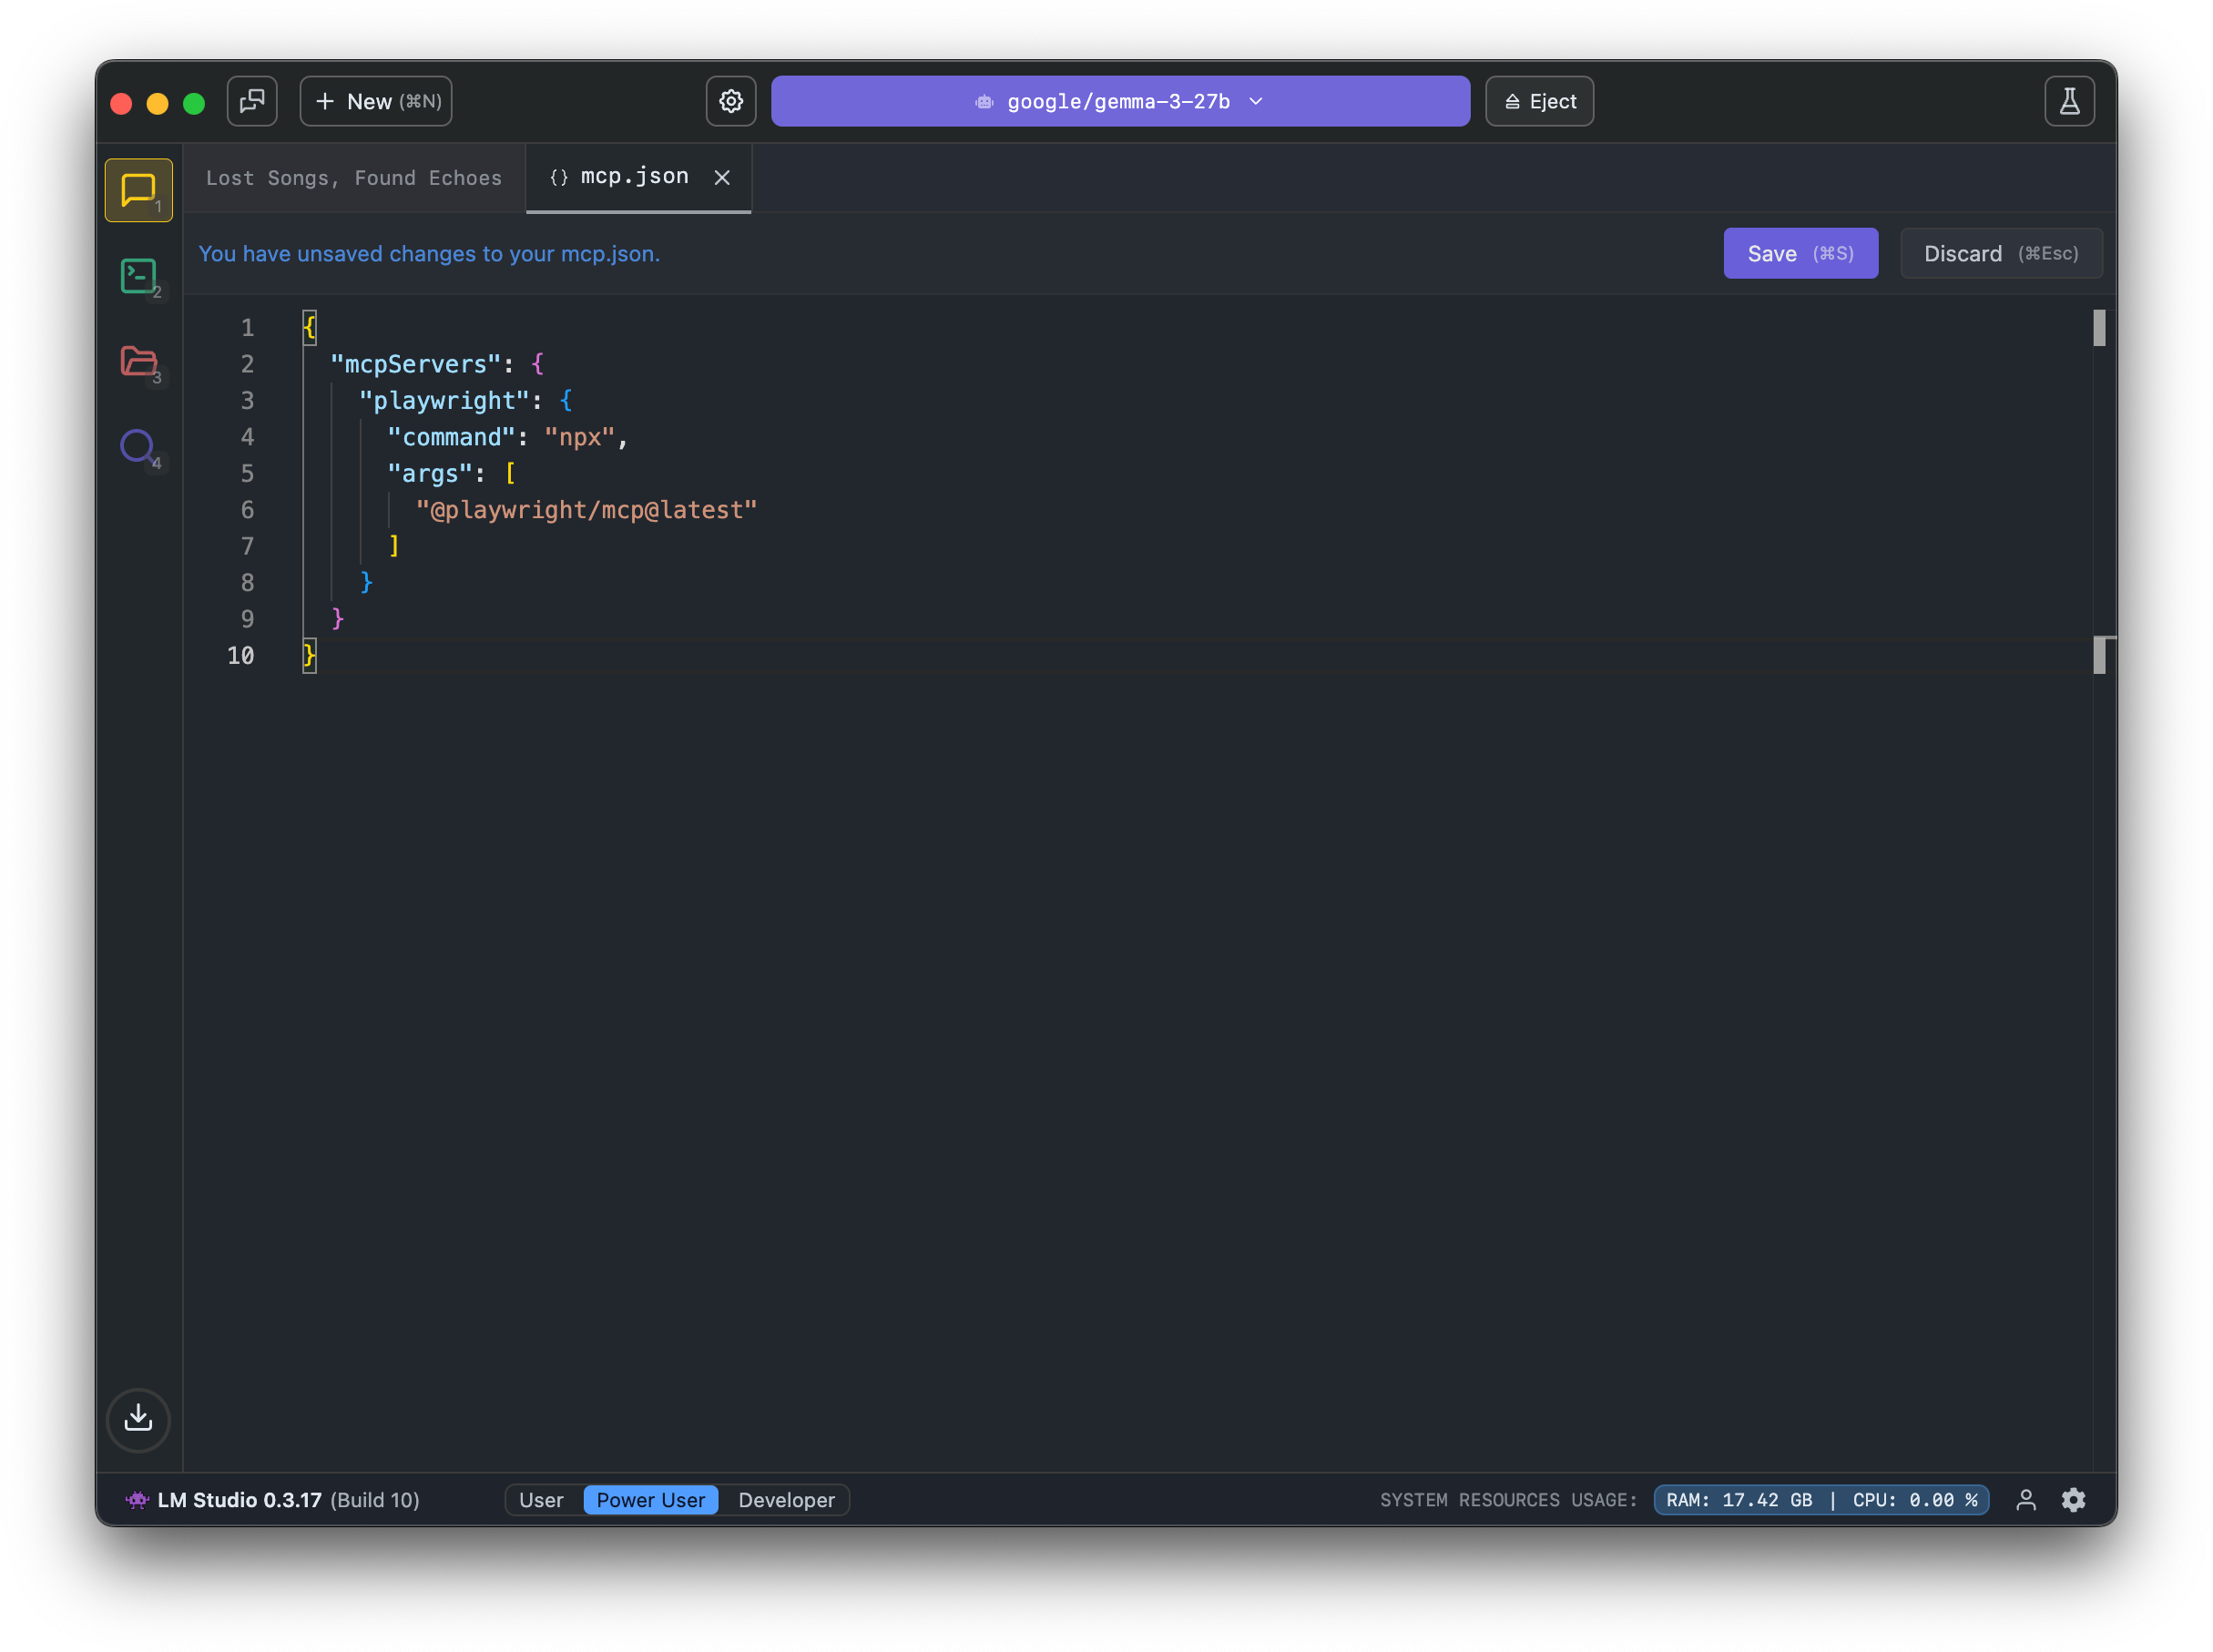 ### Example MCP to try: Hugging Face MCP Server
This MCP server provides access to functions like model and dataset search.
### Example MCP to try: Hugging Face MCP Server
This MCP server provides access to functions like model and dataset search.
 ## Importing, Publishing, and Updating Downloaded Presets
Presets are JSON files. You can share them by sending around the JSON, or you can share them by publishing them to the LM Studio Hub.
You can also import Presets from other users by URL. See the [Import](/docs/app/presets/import) and [Publish](/docs/app/presets/publish) sections for more details.
## Example: Build your own Prompt Library
You can create your own prompt library by using Presets.
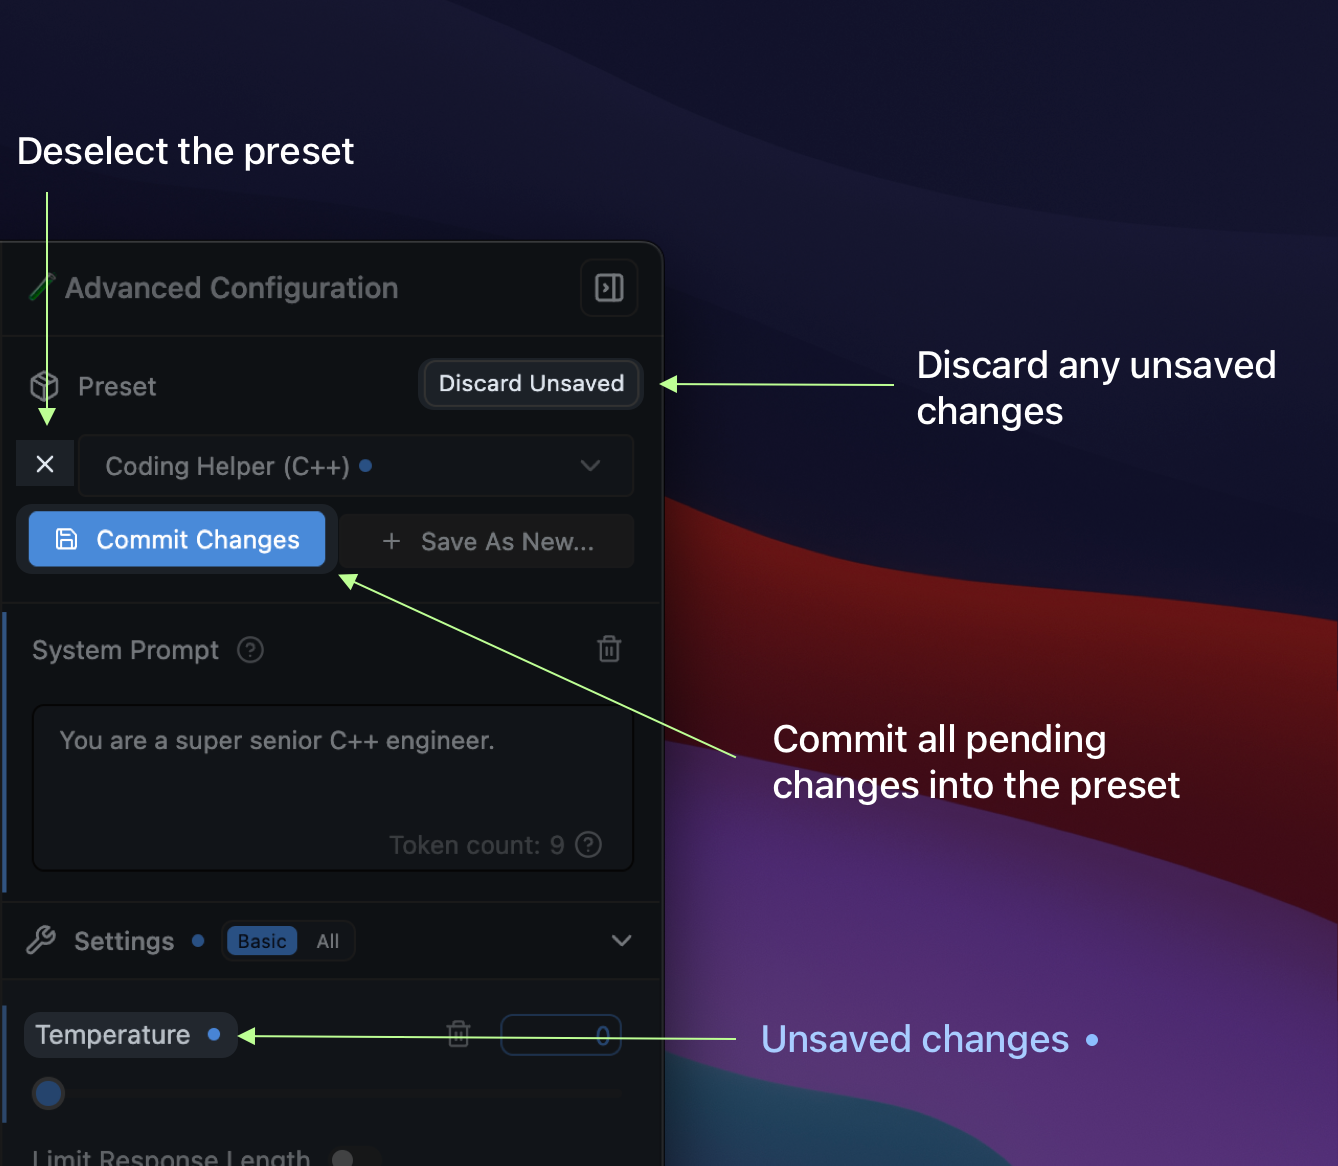
In addition to system prompts, every parameter under the Advanced Configuration sidebar can be recorded in a named Preset.
For example, you might want to always use a certain Temperature, Top P, or Max Tokens for a particular use case. You can save these settings as a Preset (with or without a system prompt) and easily switch between them.
#### The Use Case for Presets
- Save your system prompts, inference parameters as a named `Preset`.
- Easily switch between different use cases, such as reasoning, creative writing, multi-turn conversations, or brainstorming.
## Where Presets are stored
Presets are stored in the following directory:
#### macOS or Linux
```xml
~/.lmstudio/config-presets
```
#### Windows
```xml
%USERPROFILE%\.lmstudio\config-presets
```
### Migration from LM Studio 0.2.\* Presets
- Presets you've saved in LM Studio 0.2.\* are automatically readable in 0.3.3 with no migration step needed.
- If you save **new changes** in a **legacy preset**, it'll be **copied** to a new format upon save.
- The old files are NOT deleted.
- Notable difference: Load parameters are not included in the new preset format.
- Favor editing the model's default config in My Models. See [how to do it here](/docs/configuration/per-model).
## Importing, Publishing, and Updating Downloaded Presets
Presets are JSON files. You can share them by sending around the JSON, or you can share them by publishing them to the LM Studio Hub.
You can also import Presets from other users by URL. See the [Import](/docs/app/presets/import) and [Publish](/docs/app/presets/publish) sections for more details.
## Example: Build your own Prompt Library
You can create your own prompt library by using Presets.
In addition to system prompts, every parameter under the Advanced Configuration sidebar can be recorded in a named Preset.
For example, you might want to always use a certain Temperature, Top P, or Max Tokens for a particular use case. You can save these settings as a Preset (with or without a system prompt) and easily switch between them.
#### The Use Case for Presets
- Save your system prompts, inference parameters as a named `Preset`.
- Easily switch between different use cases, such as reasoning, creative writing, multi-turn conversations, or brainstorming.
## Where Presets are stored
Presets are stored in the following directory:
#### macOS or Linux
```xml
~/.lmstudio/config-presets
```
#### Windows
```xml
%USERPROFILE%\.lmstudio\config-presets
```
### Migration from LM Studio 0.2.\* Presets
- Presets you've saved in LM Studio 0.2.\* are automatically readable in 0.3.3 with no migration step needed.
- If you save **new changes** in a **legacy preset**, it'll be **copied** to a new format upon save.
- The old files are NOT deleted.
- Notable difference: Load parameters are not included in the new preset format.
- Favor editing the model's default config in My Models. See [how to do it here](/docs/configuration/per-model).
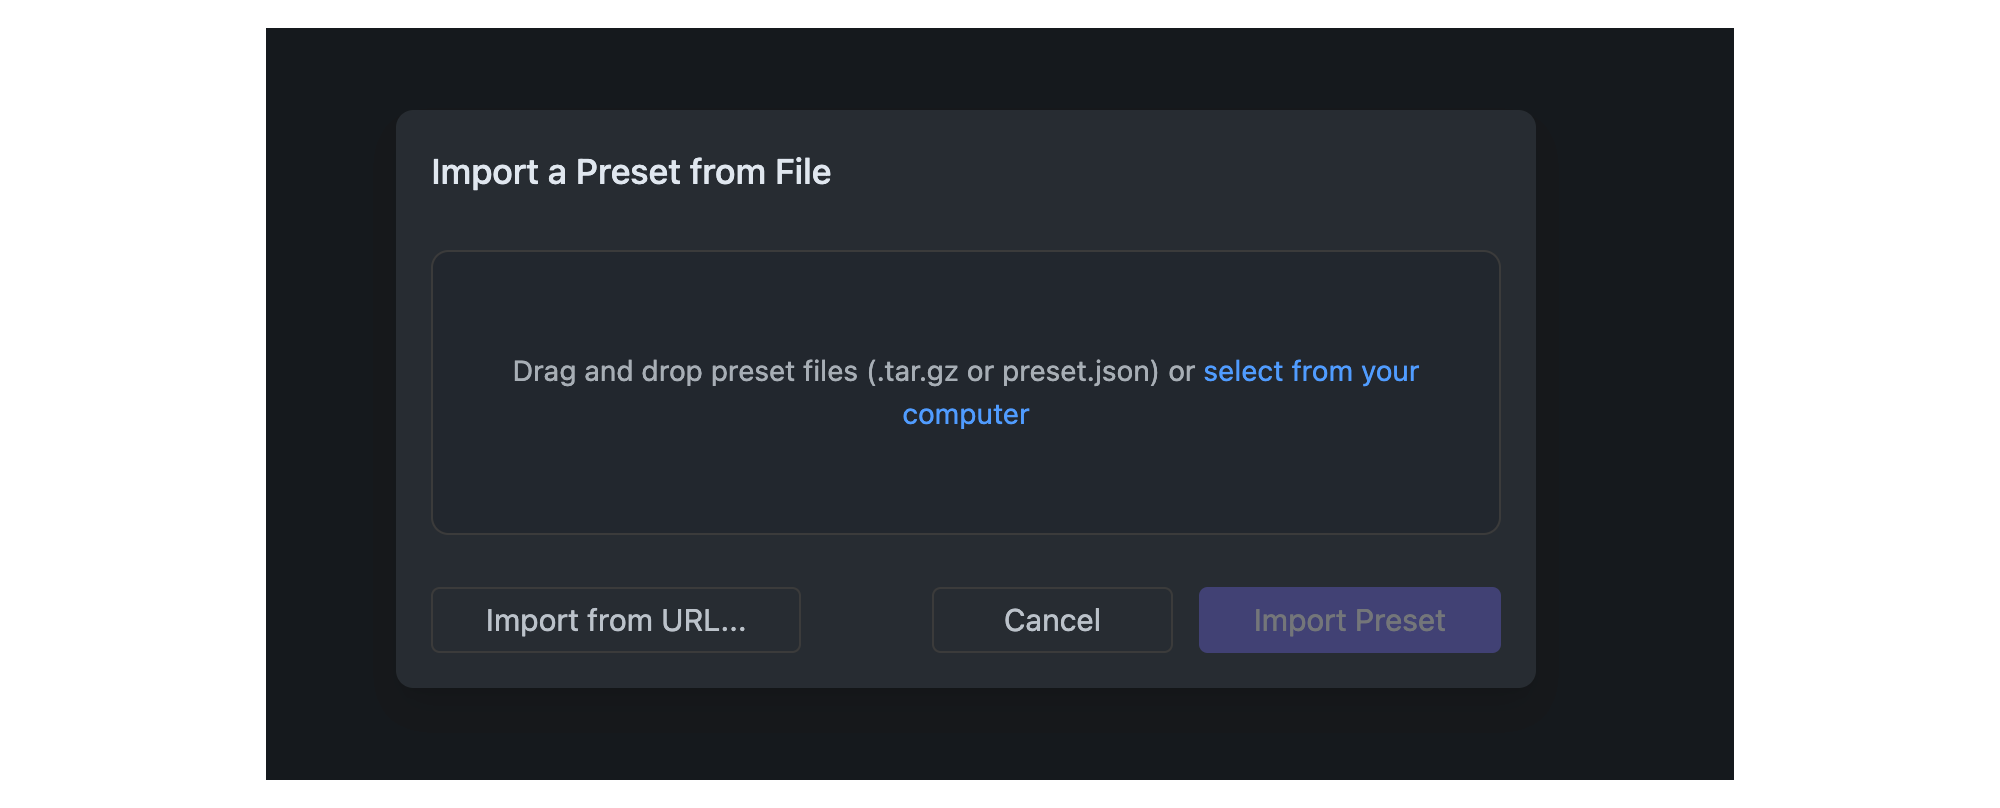
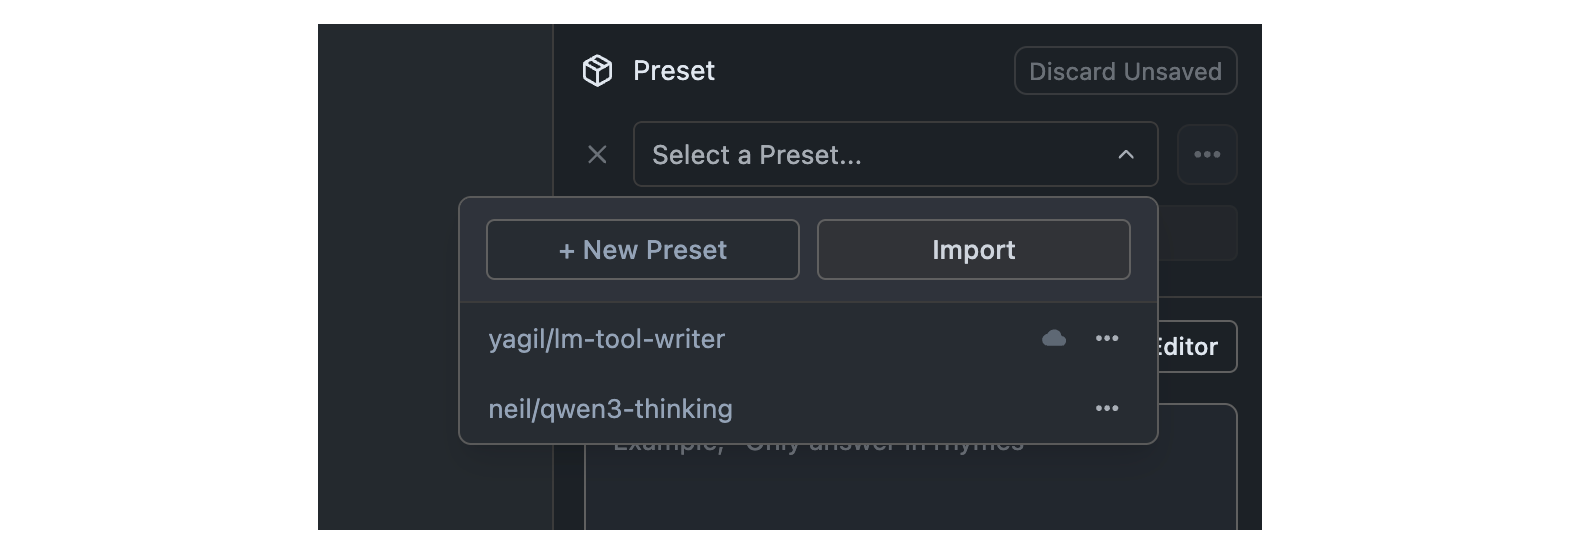 ## Import Presets from File
Once you click the Import button, you can select the source of the preset you want to import. You can either import from a file or from a URL.
## Import Presets from File
Once you click the Import button, you can select the source of the preset you want to import. You can either import from a file or from a URL.
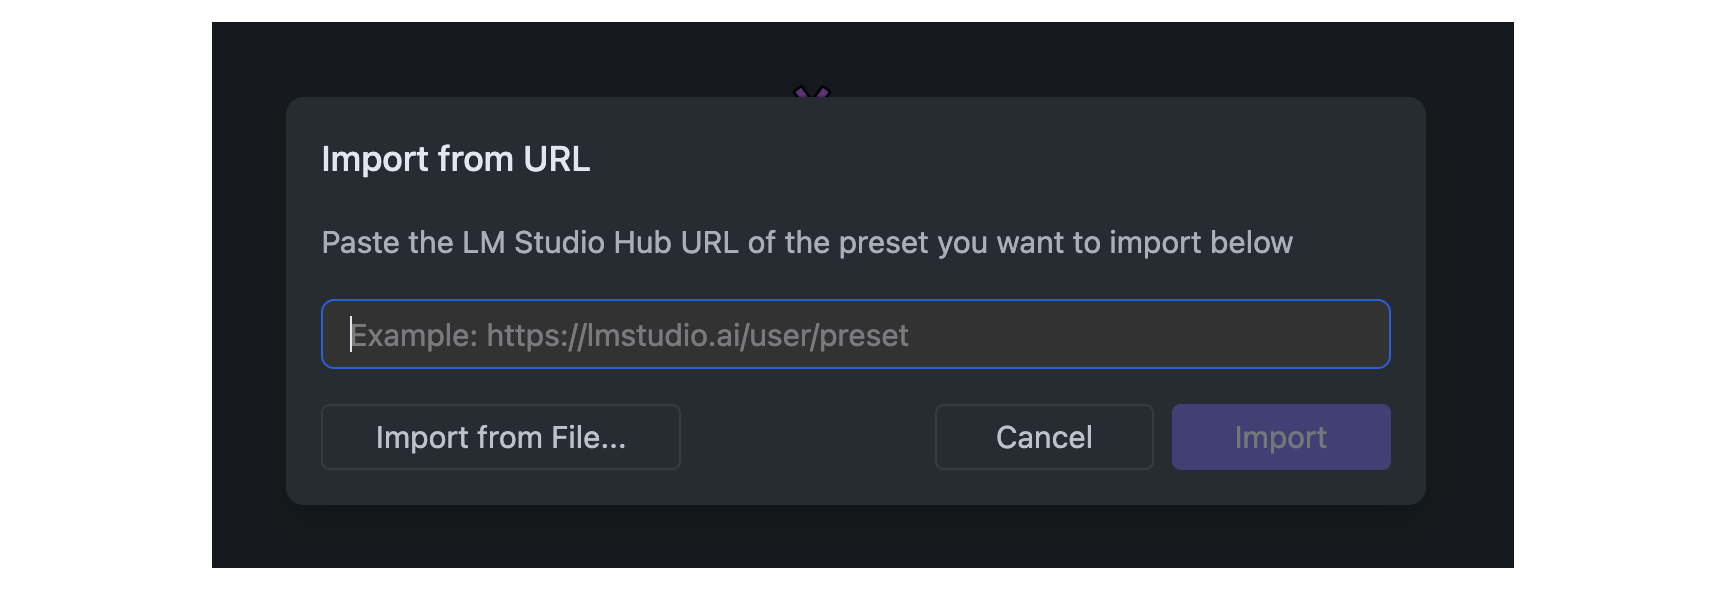
 ## Import Presets from URL
Presets that are [published](/docs/app/presets/publish) to the LM Studio Hub can be imported by providing their URL.
Importing public presets does not require logging in within LM Studio.
## Import Presets from URL
Presets that are [published](/docs/app/presets/publish) to the LM Studio Hub can be imported by providing their URL.
Importing public presets does not require logging in within LM Studio.
 ### Using `lms` CLI
You can also use the CLI to import presets from URL. This is useful for sharing presets with others.
```
lms get {author}/{preset-name}
```
Example:
```bash
lms get neil/qwen3-thinking
```
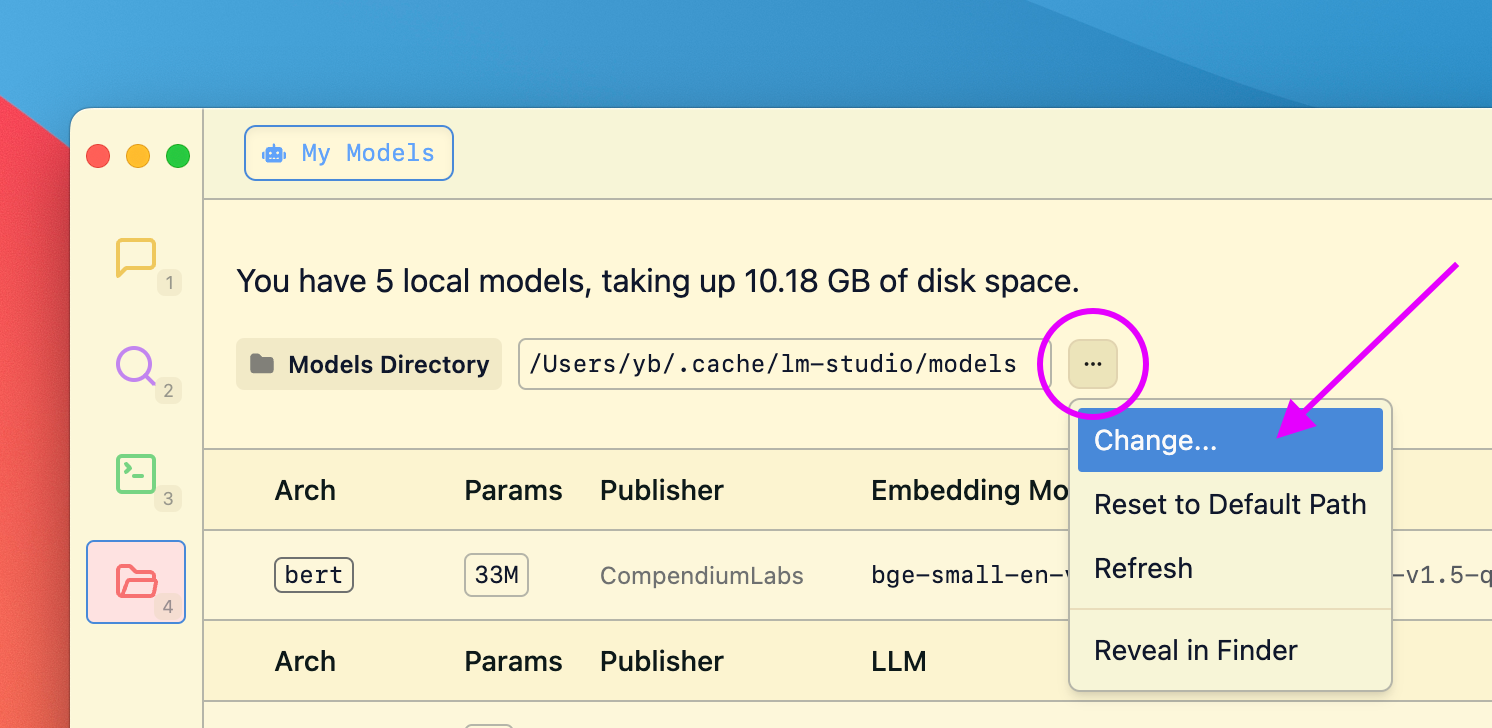
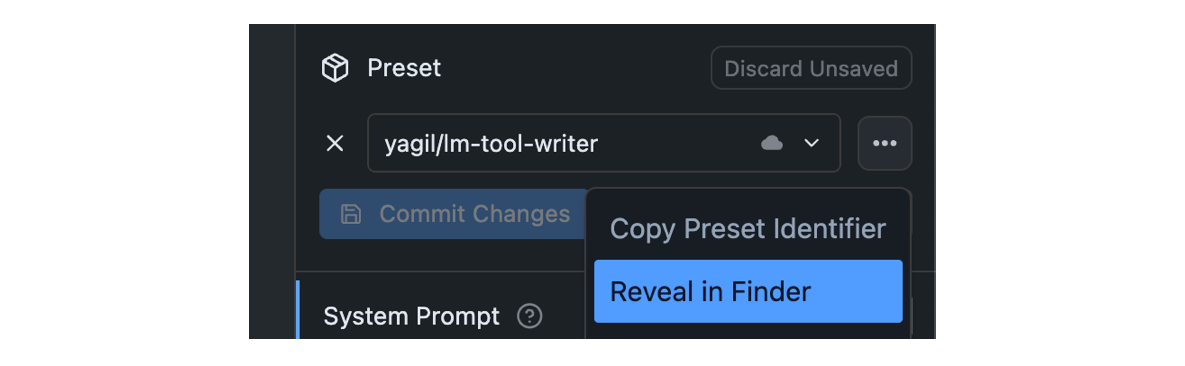
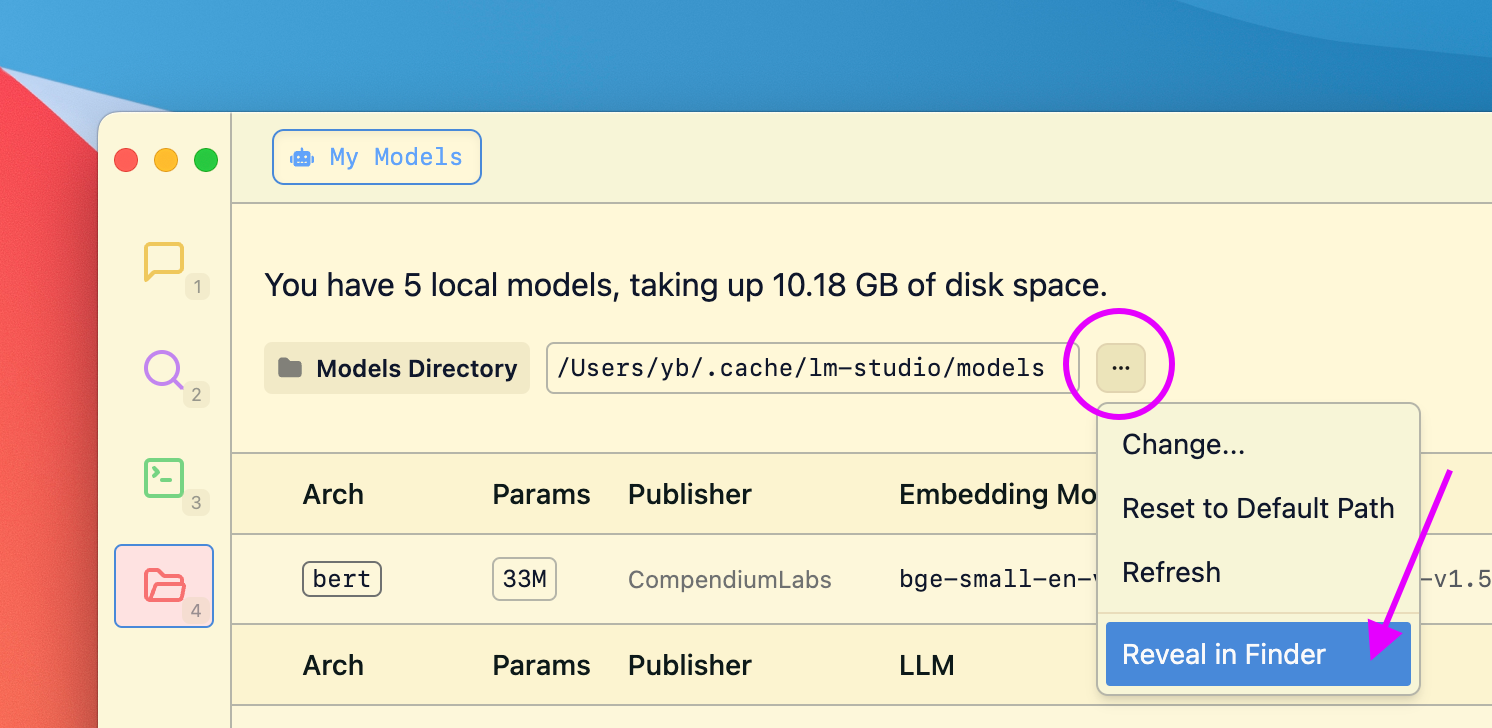
### Find your config-presets directory
LM Studio manages config presets on disk. Presets are local and private by default. You or others can choose to share them by sharing the file.
Click on the `•••` button in the Preset dropdown and select "Reveal in Finder" (or "Show in Explorer" on Windows).
### Using `lms` CLI
You can also use the CLI to import presets from URL. This is useful for sharing presets with others.
```
lms get {author}/{preset-name}
```
Example:
```bash
lms get neil/qwen3-thinking
```
### Find your config-presets directory
LM Studio manages config presets on disk. Presets are local and private by default. You or others can choose to share them by sharing the file.
Click on the `•••` button in the Preset dropdown and select "Reveal in Finder" (or "Show in Explorer" on Windows).
 This will download the preset file and automatically surface it in the preset dropdown in the app.
### Where Hub shared presets are stored
Presets you share, and ones you download from the LM Studio Hub are saved in `~/.lmstudio/hub` on macOS and Linux, or `%USERPROFILE%\.lmstudio\hub` on Windows.
### Publish Your Presets
> Publish your Presets to the LM Studio Hub. Share your Presets with the community or with your colleagues.
`Feature In Preview`
Starting LM Studio 0.3.15, you can publish your Presets to the LM Studio community. This allows you to share your Presets with others and import Presets from other users.
This feature is early and we would love to hear your feedback. Please report bugs and feedback to bugs@lmstudio.ai.
---
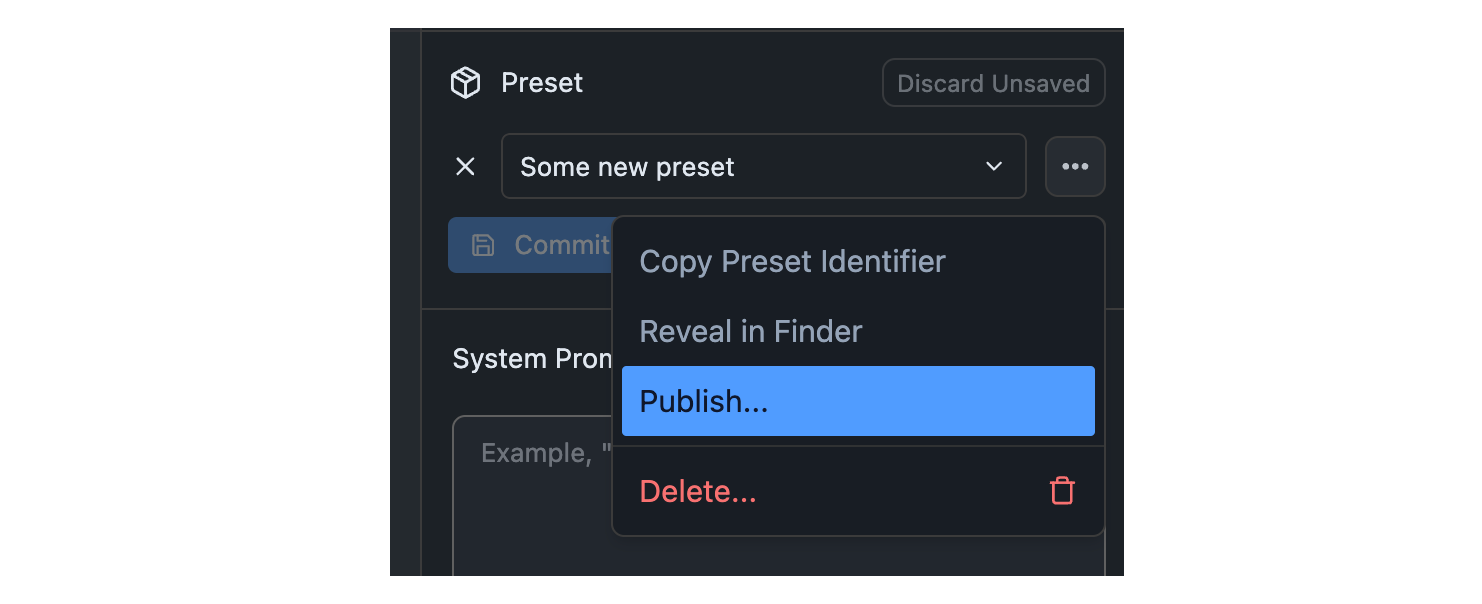
## Step 1: Click the Publish Button
Identify the Preset you want to publish in the Preset dropdown. Click the `•••` button and select "Publish" from the menu.
This will download the preset file and automatically surface it in the preset dropdown in the app.
### Where Hub shared presets are stored
Presets you share, and ones you download from the LM Studio Hub are saved in `~/.lmstudio/hub` on macOS and Linux, or `%USERPROFILE%\.lmstudio\hub` on Windows.
### Publish Your Presets
> Publish your Presets to the LM Studio Hub. Share your Presets with the community or with your colleagues.
`Feature In Preview`
Starting LM Studio 0.3.15, you can publish your Presets to the LM Studio community. This allows you to share your Presets with others and import Presets from other users.
This feature is early and we would love to hear your feedback. Please report bugs and feedback to bugs@lmstudio.ai.
---
## Step 1: Click the Publish Button
Identify the Preset you want to publish in the Preset dropdown. Click the `•••` button and select "Publish" from the menu.
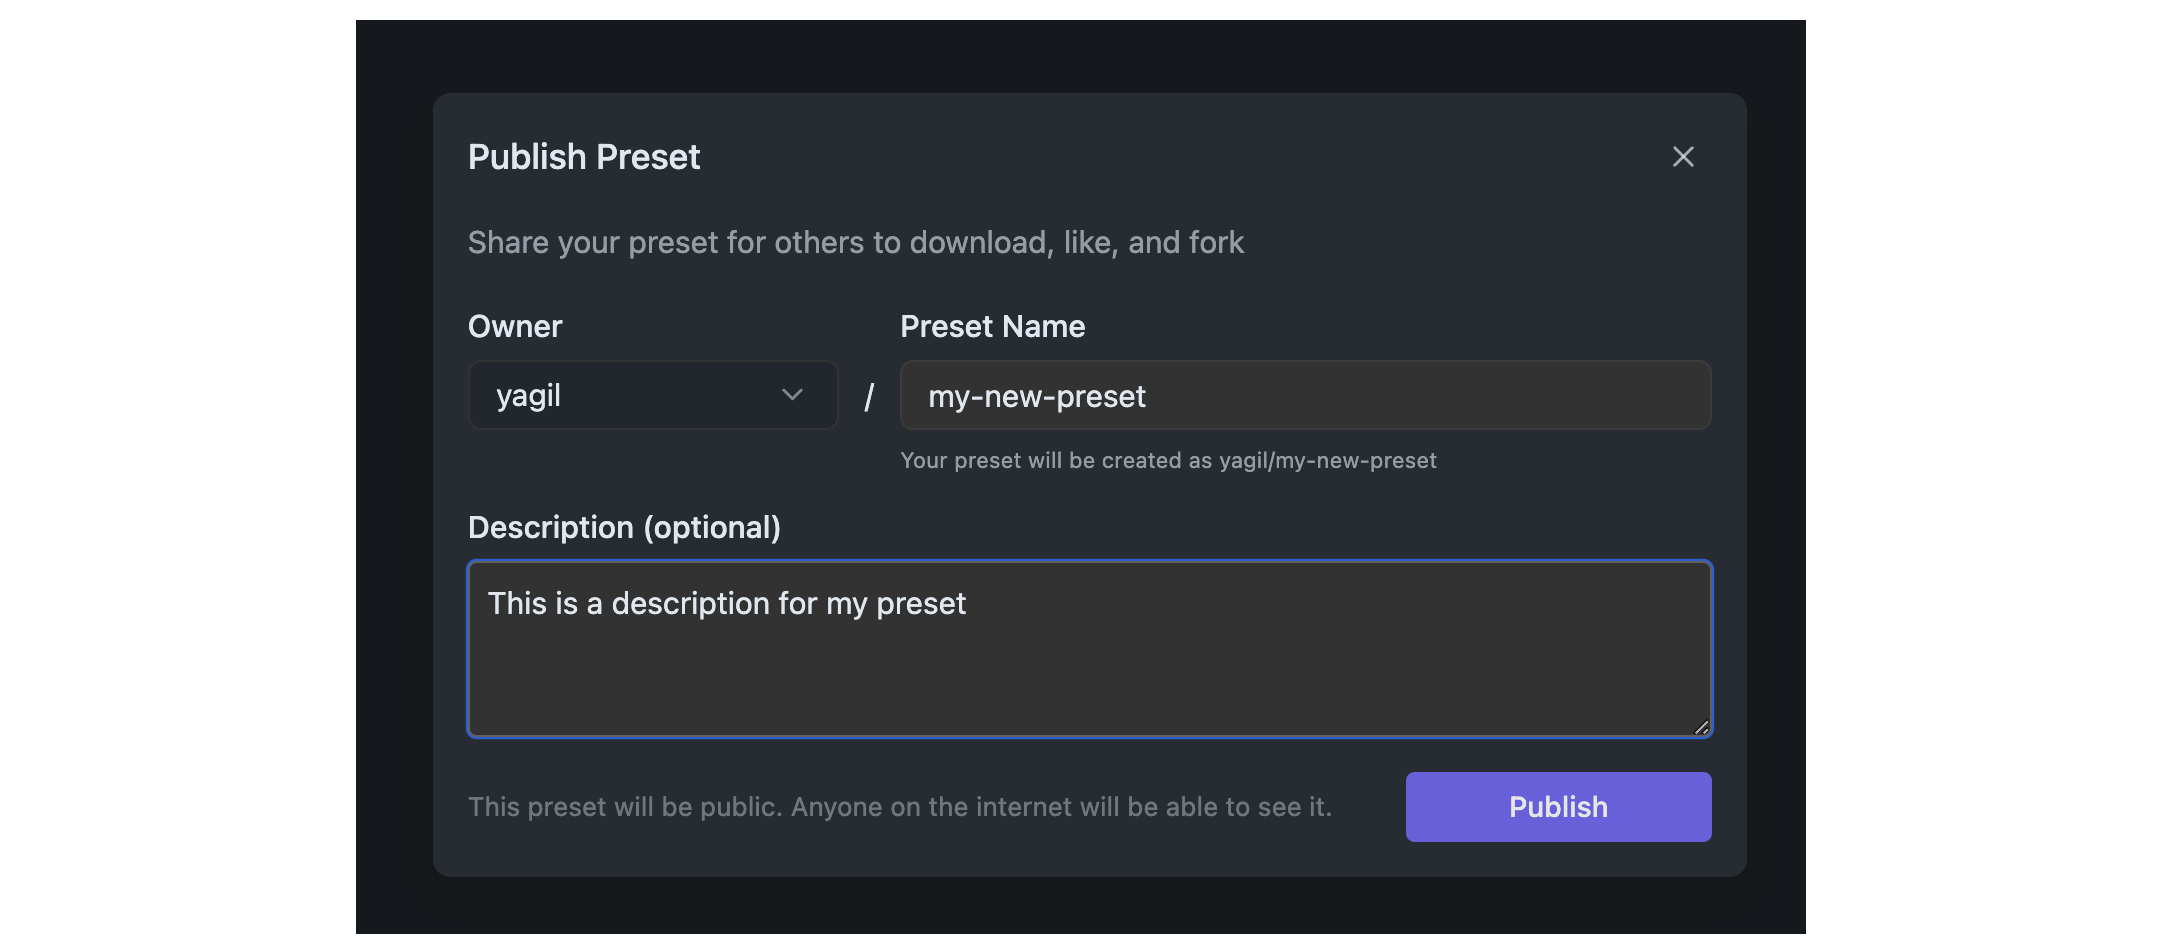
 ## Step 2: Set the Preset Details
You will be prompted to set the details of your Preset. This includes the name (slug) and optional description.
Community presets are public and can be used by anyone on the internet!
## Step 2: Set the Preset Details
You will be prompted to set the details of your Preset. This includes the name (slug) and optional description.
Community presets are public and can be used by anyone on the internet!
 #### Privacy and Terms
For good measure, visit the [Privacy Policy](https://lmstudio.ai/hub-privacy) and [Terms of Service](https://lmstudio.ai/hub-terms) to understand what's suitable to share on the Hub, and how data is handled. Community presets are public and visible to everyone. Make sure you agree to what these documents say before publishing your Preset.
### Pull Updates
> How to pull the latest revisions of your Presets, or presets you have imported from others.
`Feature In Preview`
You can pull the latest revisions of your Presets, or presets you have imported from others. This is useful for keeping your Presets up to date with the latest changes.
#### Privacy and Terms
For good measure, visit the [Privacy Policy](https://lmstudio.ai/hub-privacy) and [Terms of Service](https://lmstudio.ai/hub-terms) to understand what's suitable to share on the Hub, and how data is handled. Community presets are public and visible to everyone. Make sure you agree to what these documents say before publishing your Preset.
### Pull Updates
> How to pull the latest revisions of your Presets, or presets you have imported from others.
`Feature In Preview`
You can pull the latest revisions of your Presets, or presets you have imported from others. This is useful for keeping your Presets up to date with the latest changes.
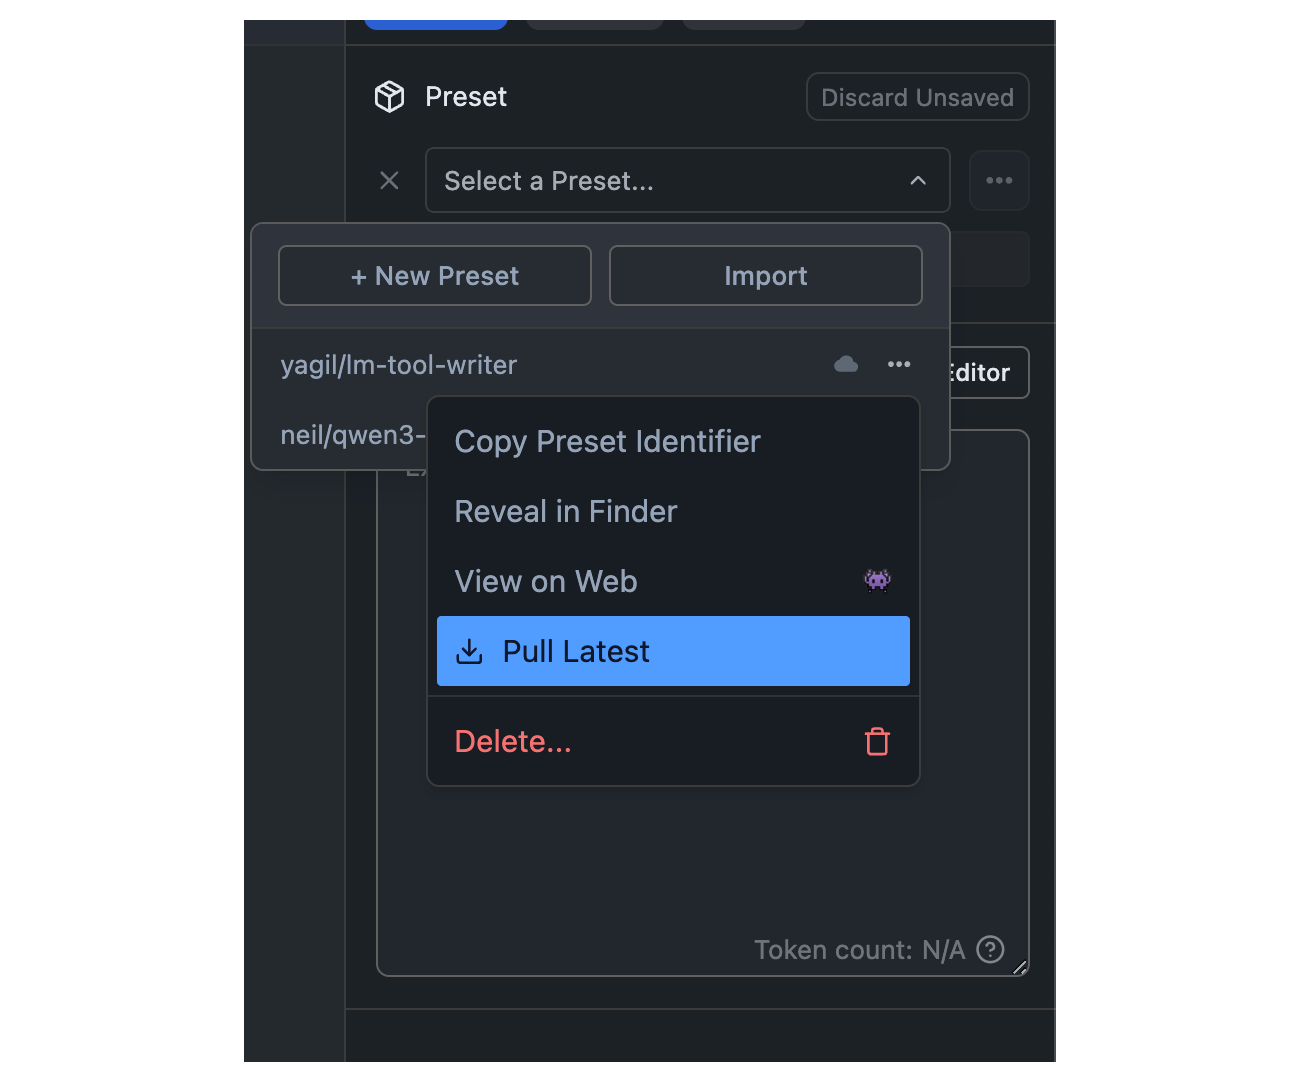 ## Your Presets vs Others'
Both your published Presets and other downloaded Presets can be pulled and updated the same way.
### Push New Revisions
> Publish new revisions of your Presets to the LM Studio Hub.
`Feature In Preview`
Starting LM Studio 0.3.15, you can publish your Presets to the LM Studio community. This allows you to share your Presets with others and import Presets from other users.
This feature is early and we would love to hear your feedback. Please report bugs and feedback to bugs@lmstudio.ai.
---
## Published Presets
Presets you share on the LM Studio Hub can be updated.
## Your Presets vs Others'
Both your published Presets and other downloaded Presets can be pulled and updated the same way.
### Push New Revisions
> Publish new revisions of your Presets to the LM Studio Hub.
`Feature In Preview`
Starting LM Studio 0.3.15, you can publish your Presets to the LM Studio community. This allows you to share your Presets with others and import Presets from other users.
This feature is early and we would love to hear your feedback. Please report bugs and feedback to bugs@lmstudio.ai.
---
## Published Presets
Presets you share on the LM Studio Hub can be updated.
 ## Step 1: Make Changes and Commit
Make any changes to your Preset, both in parameters that are already included in the Preset, or by adding new parameters.
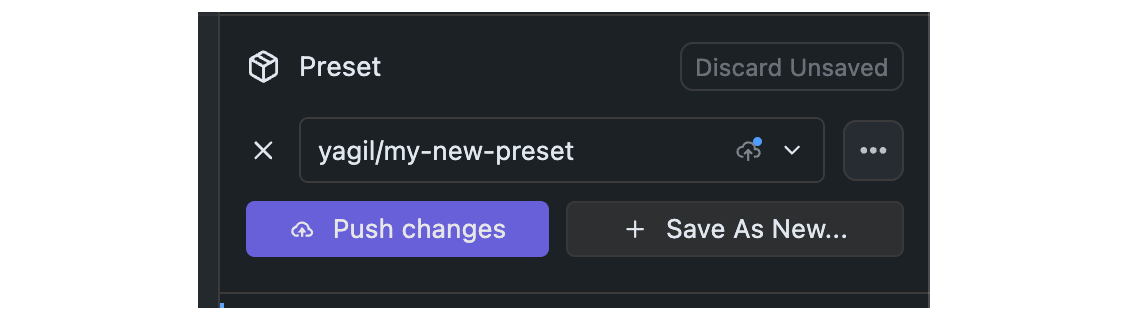
## Step 2: Click the Push Button
Once changes are committed, you will see a `Push` button. Click it to push your changes to the Hub.
Pushing changes will result in a new revision of your Preset on the Hub.
## Step 1: Make Changes and Commit
Make any changes to your Preset, both in parameters that are already included in the Preset, or by adding new parameters.
## Step 2: Click the Push Button
Once changes are committed, you will see a `Push` button. Click it to push your changes to the Hub.
Pushing changes will result in a new revision of your Preset on the Hub.
 ## advanced
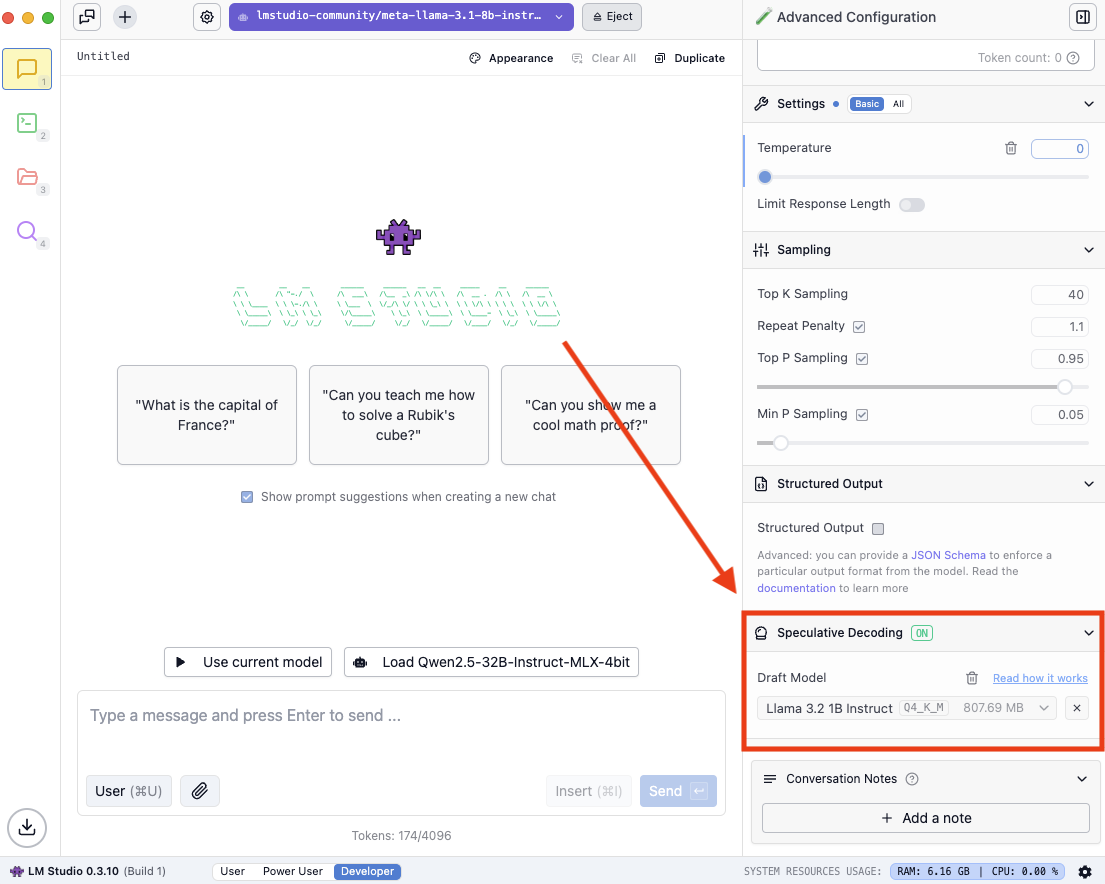
### Speculative Decoding
> Speed up generation with a draft model
`Advanced`
Speculative decoding is a technique that can substantially increase the generation speed of large language models (LLMs) without reducing response quality.
## advanced
### Speculative Decoding
> Speed up generation with a draft model
`Advanced`
Speculative decoding is a technique that can substantially increase the generation speed of large language models (LLMs) without reducing response quality.
 ### Finding compatible draft models
You might see the following when you open the dropdown:
### Finding compatible draft models
You might see the following when you open the dropdown:
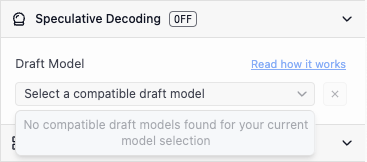 Try to download a lower parameter variant of the model you have loaded, if it exists. If no smaller versions of your model exist, find a pairing that does.
For example:
Try to download a lower parameter variant of the model you have loaded, if it exists. If no smaller versions of your model exist, find a pairing that does.
For example:
 LM Studio aims to preserves the directory structure of models downloaded from Hugging Face. The expected directory structure is as follows:
```xml
~/.lmstudio/models/
└── publisher/
└── model/
└── model-file.gguf
```
For example, if you have a model named `ocelot-v1` published by `infra-ai`, the structure would look like this:
```xml
~/.lmstudio/models/
└── infra-ai/
└── ocelot-v1/
└── ocelot-v1-instruct-q4_0.gguf
```
LM Studio aims to preserves the directory structure of models downloaded from Hugging Face. The expected directory structure is as follows:
```xml
~/.lmstudio/models/
└── publisher/
└── model/
└── model-file.gguf
```
For example, if you have a model named `ocelot-v1` published by `infra-ai`, the structure would look like this:
```xml
~/.lmstudio/models/
└── infra-ai/
└── ocelot-v1/
└── ocelot-v1-instruct-q4_0.gguf
```
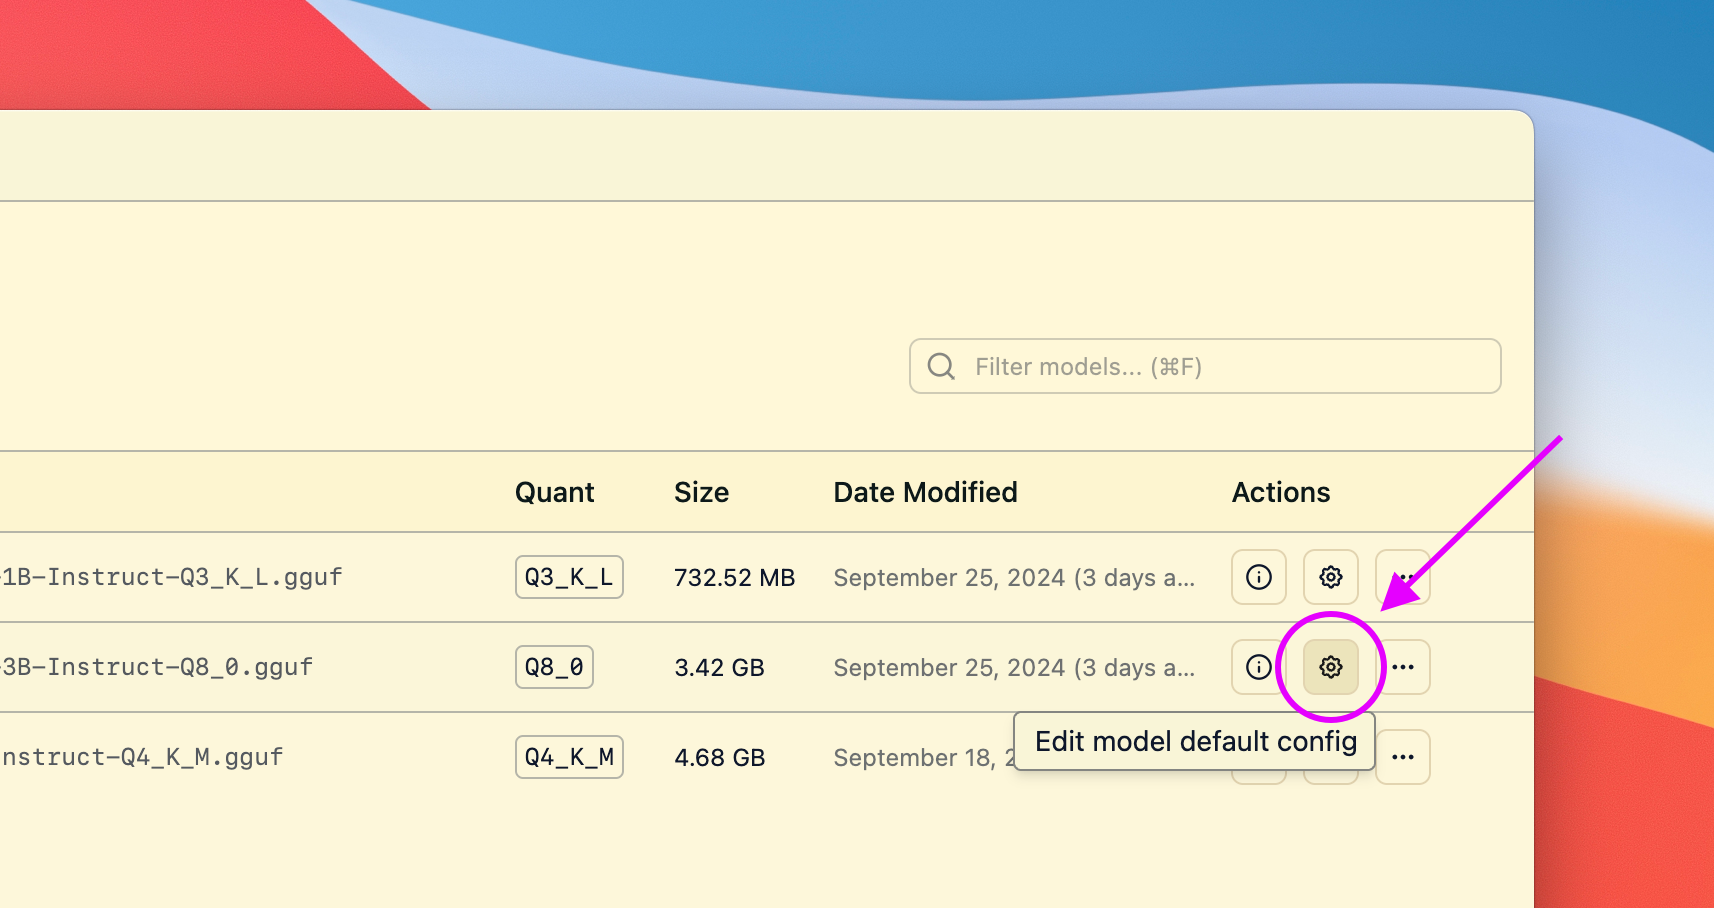 This will open a dialog where you can set the default parameters for the model.
Next time you load the model, these settings will be used.
```lms_protip
#### Reasons to set default load parameters (not required, totally optional)
- Set a particular GPU offload settings for a given model
- Set a particular context size for a given model
- Whether or not to utilize Flash Attention for a given model
```
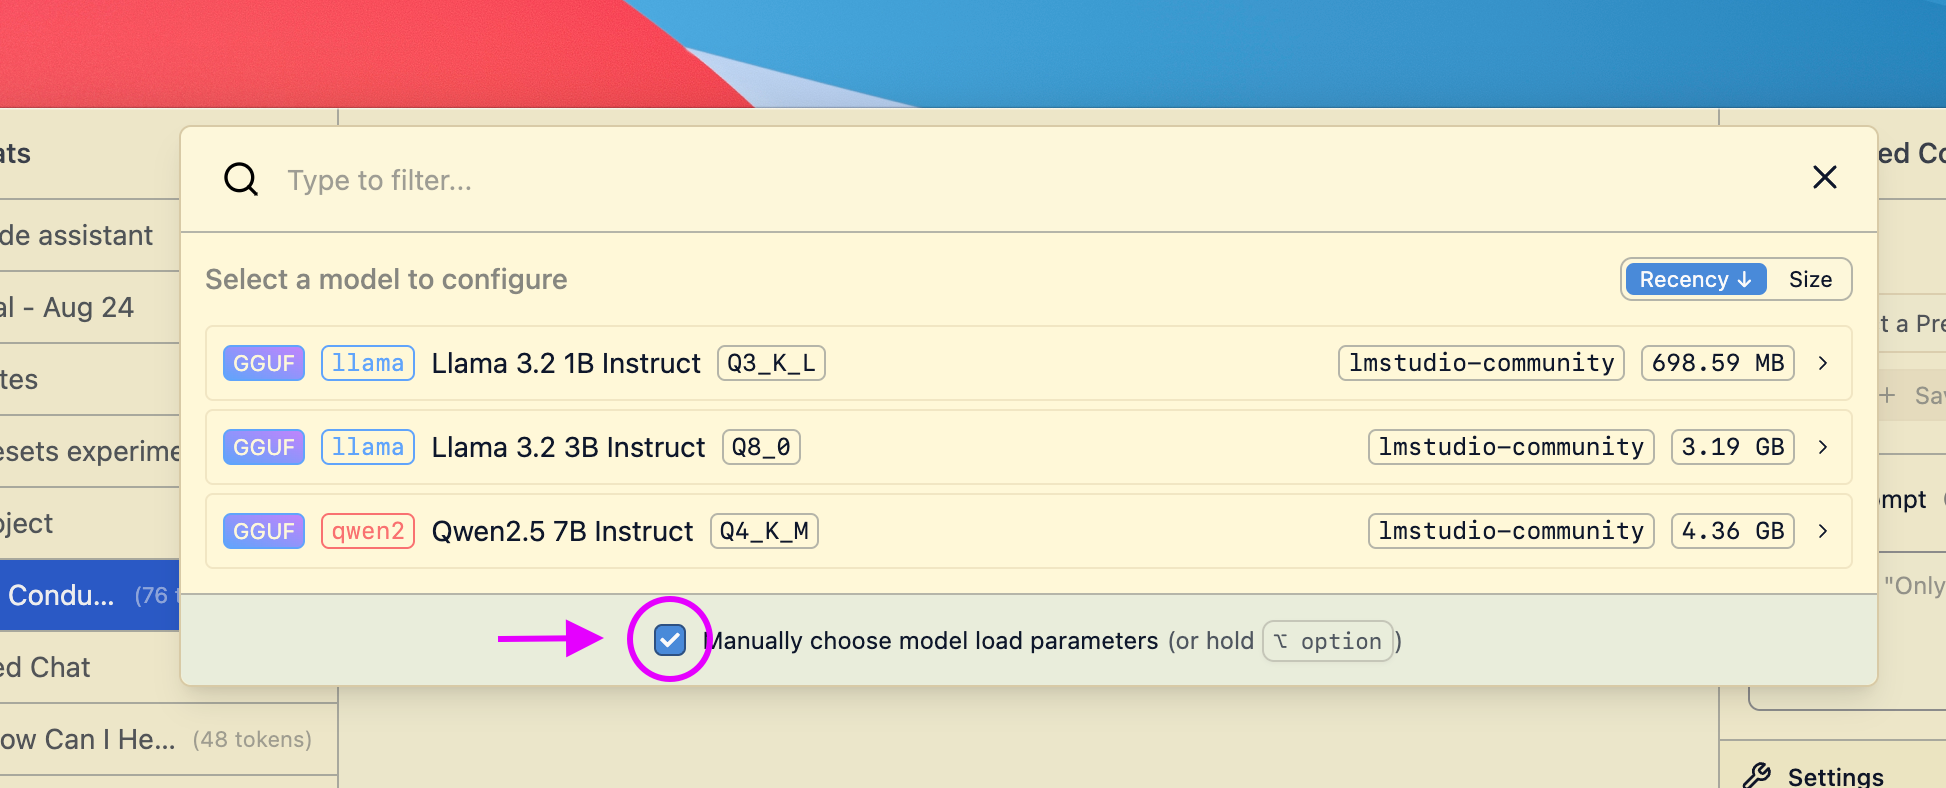
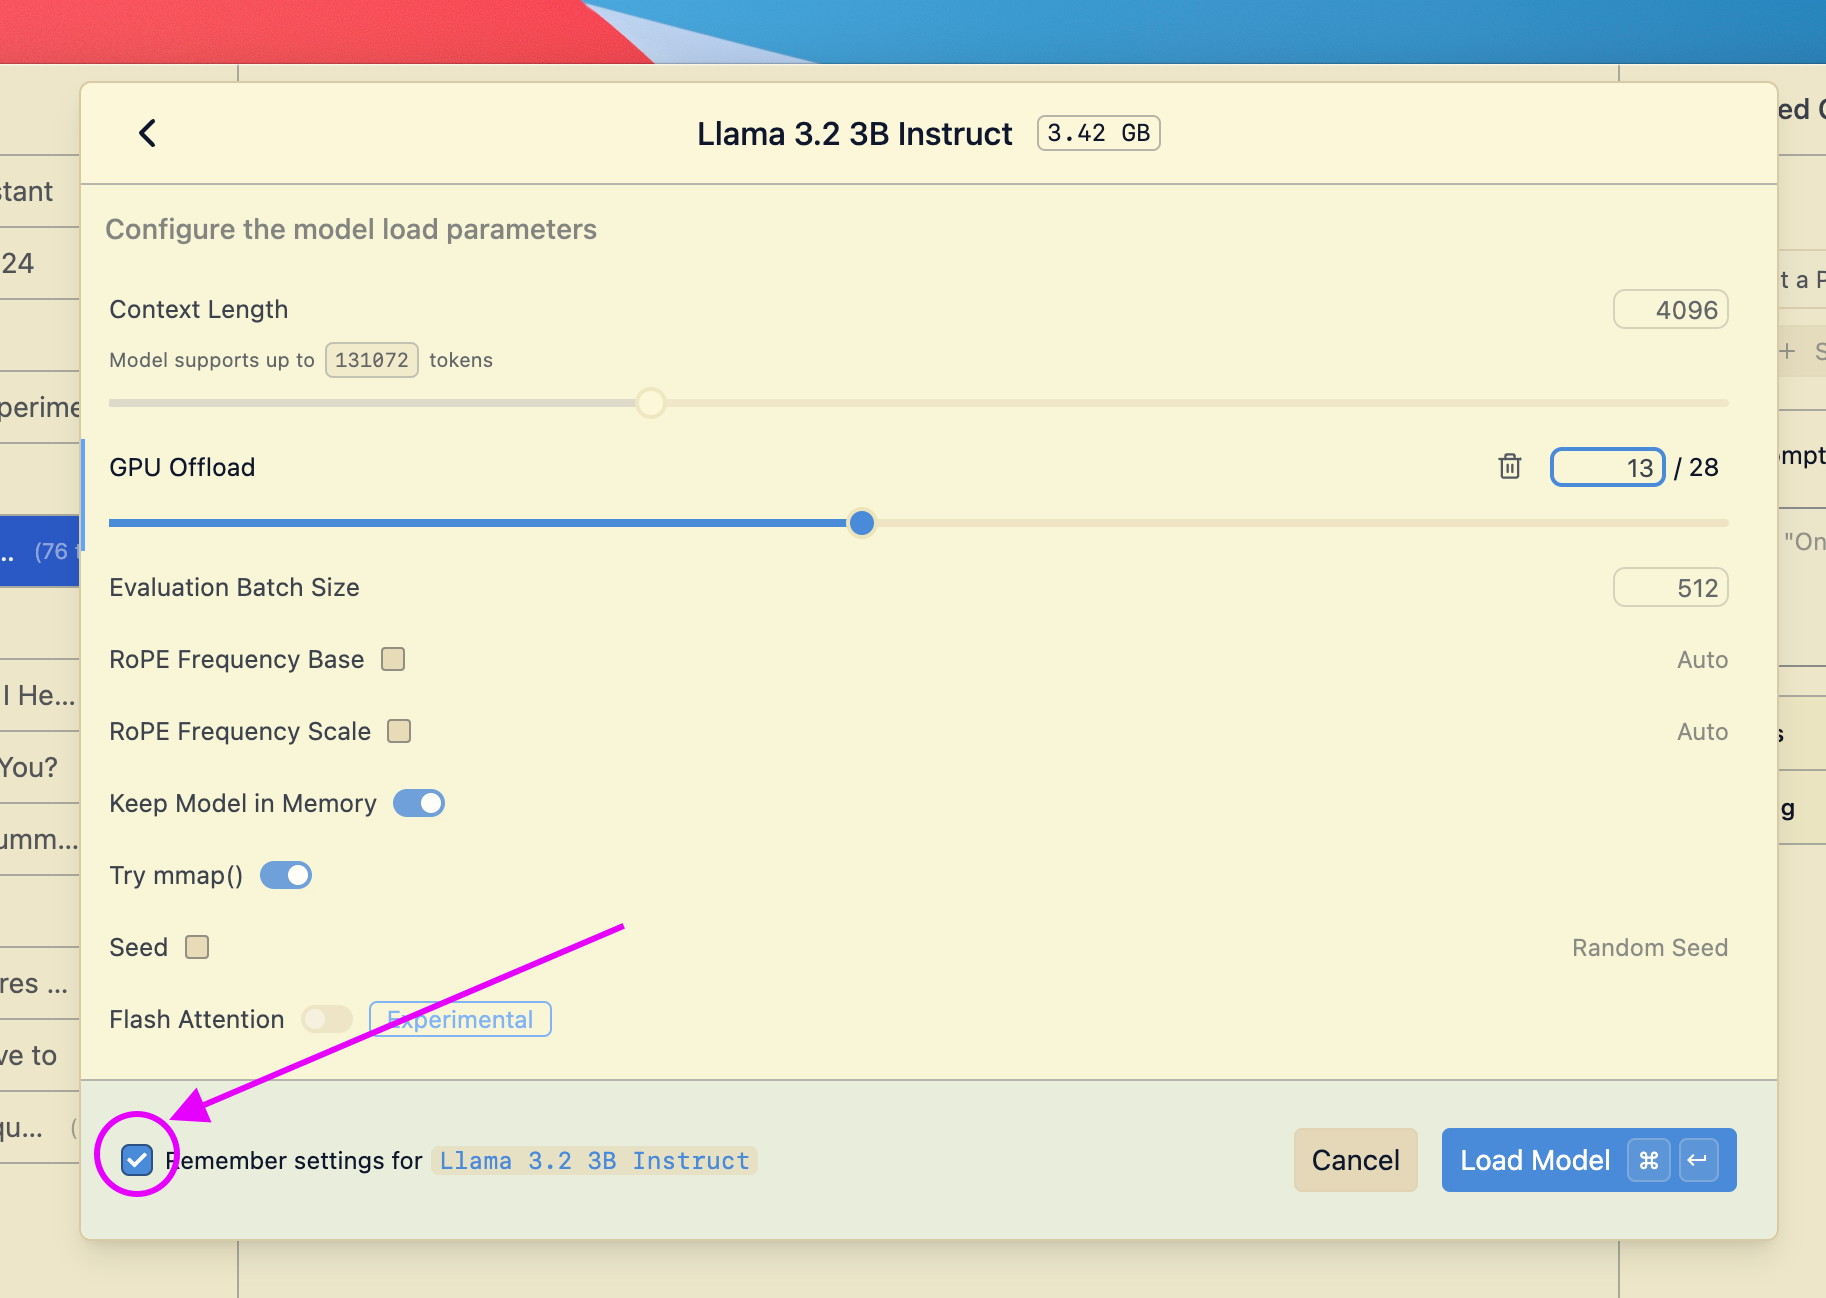
## Advanced Topics
### Changing load settings before loading a model
When you load a model, you can optionally change the default load settings.
This will open a dialog where you can set the default parameters for the model.
Next time you load the model, these settings will be used.
```lms_protip
#### Reasons to set default load parameters (not required, totally optional)
- Set a particular GPU offload settings for a given model
- Set a particular context size for a given model
- Whether or not to utilize Flash Attention for a given model
```
## Advanced Topics
### Changing load settings before loading a model
When you load a model, you can optionally change the default load settings.
 ### Saving your changes as the default settings for a model
If you make changes to load settings when you load a model, you can save them as the default settings for that model.
### Saving your changes as the default settings for a model
If you make changes to load settings when you load a model, you can save them as the default settings for that model.
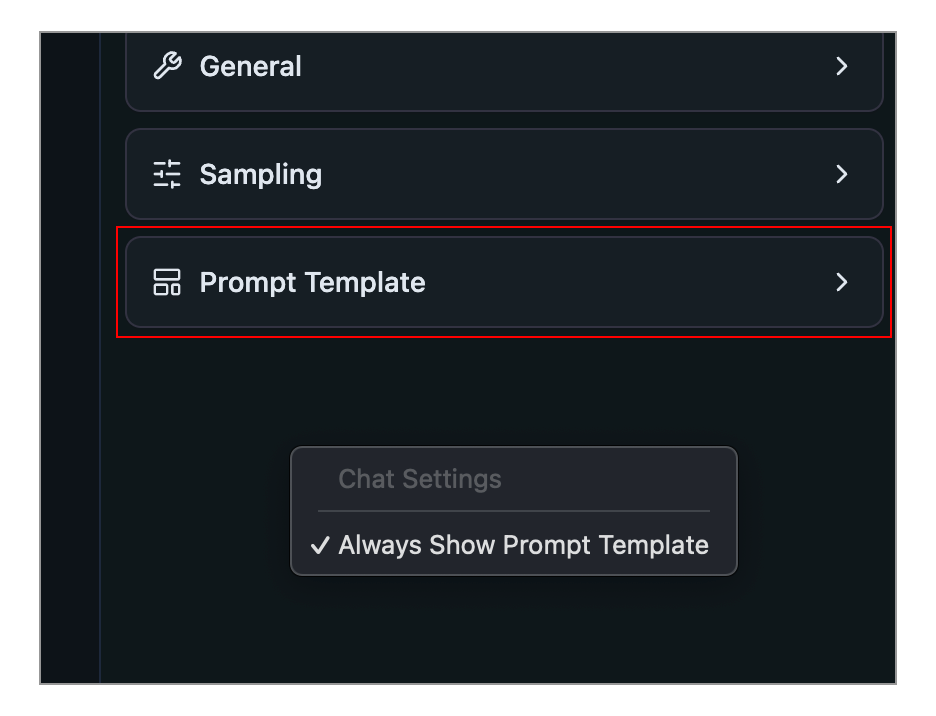 You can make this config box always show up by right clicking the sidebar and selecting **Always Show Prompt Template**.
### Prompt template options
#### Jinja Template
You can express the prompt template in Jinja.
###### 💡 [Jinja](https://en.wikipedia.org/wiki/Jinja_(template_engine)) is a templating engine used to encode the prompt template in several popular LLM model file formats.
#### Manual
You can also express the prompt template manually by specifying message role prefixes and suffixes.
You can make this config box always show up by right clicking the sidebar and selecting **Always Show Prompt Template**.
### Prompt template options
#### Jinja Template
You can express the prompt template in Jinja.
###### 💡 [Jinja](https://en.wikipedia.org/wiki/Jinja_(template_engine)) is a templating engine used to encode the prompt template in several popular LLM model file formats.
#### Manual
You can also express the prompt template manually by specifying message role prefixes and suffixes.
 ### Which mode should I choose?
#### `User`
Show only the chat interface, and auto-configure everything. This is the best choice for beginners or anyone who's happy with the default settings.
#### `Power User`
Use LM Studio in this mode if you want access to configurable [load](/docs/configuration/load) and [inference](/docs/configuration/inference) parameters as well as advanced chat features such as [insert, edit, & continue](/docs/advanced/context) (for either role, user or assistant).
#### `Developer`
Full access to all aspects in LM Studio. This includes keyboard shortcuts and development features. Check out the Developer section under Settings for more.
### Color Themes
> Customize LM Studio's color theme
### Selecting a Theme
Press `Cmd` + `K` then `T` (macOS) or `Ctrl` + `K` then `T` (Windows/Linux) to open the theme selector.
You can also choose a theme in the Settings tab (`Cmd` + `,` on macOS or `Ctrl` + `,` on Windows/Linux).
Choosing the "Auto" option will automatically switch between Light and Dark themes based on your system settings.
# developer
# LM Studio Developer Docs
> Build with LM Studio's local APIs and SDKs — TypeScript, Python, REST, and OpenAI‑compatible endpoints.
```lms_hstack
## Get to know the stack
- TypeScript SDK: [lmstudio-js](/docs/typescript)
- Python SDK: [lmstudio-python](/docs/python)
- LM Studio REST API: [Stateful Chats, MCPs via API](/docs/developer/rest)
- OpenAI‑compatible: [Chat, Responses, Embeddings](/docs/developer/openai-compat)
- LM Studio CLI: [`lms`](/docs/cli)
:::split:::
## What you can build
- Chat and text generation with streaming
- Tool calling and local agents with MCP
- Structured output (JSON schema)
- Embeddings and tokenization
- Model management (load, download, list)
```
## Super quick start
### TypeScript (`lmstudio-js`)
```bash
npm install @lmstudio/sdk
```
```ts
import { LMStudioClient } from "@lmstudio/sdk";
const client = new LMStudioClient();
const model = await client.llm.model("openai/gpt-oss-20b");
const result = await model.respond("Who are you, and what can you do?");
console.info(result.content);
```
Full docs: [lmstudio-js](/docs/typescript), Source: [GitHub](https://github.com/lmstudio-ai/lmstudio-js)
### Python (`lmstudio-python`)
```bash
pip install lmstudio
```
```python
import lmstudio as lms
with lms.Client() as client:
model = client.llm.model("openai/gpt-oss-20b")
result = model.respond("Who are you, and what can you do?")
print(result)
```
Full docs: [lmstudio-python](/docs/python), Source: [GitHub](https://github.com/lmstudio-ai/lmstudio-python)
### HTTP (LM Studio REST API)
```bash
lms server start --port 1234
```
```bash
curl http://localhost:1234/api/v1/chat \
-H "Content-Type: application/json" \
-H "Authorization: Bearer $LM_API_TOKEN" \
-d '{
"model": "openai/gpt-oss-20b",
"input": "Who are you, and what can you do?"
}'
```
Full docs: [LM Studio REST API](/docs/developer/rest)
## Helpful links
- [API Changelog](/docs/developer/api-changelog)
- [Local server basics](/docs/developer/core)
- [CLI reference](/docs/cli)
- [Discord Community](https://discord.gg/lmstudio)
## API Changelog
> Updates and changes to the LM Studio API.
---
###### LM Studio 0.4.0
### LM Studio native v1 REST API
- Official release of LM Studio's native v1 REST API at `/api/v1/*` endpoints.
- [MCP via API](/docs/developer/core/mcp)
- [Stateful chats](/docs/developer/rest/stateful-chats)
- [Authentication](/docs/developer/core/authentication) configuration with API tokens
- Model [download](/docs/developer/rest/download) and [load](/docs/developer/rest/load) endpoints
- See [overview](/docs/developer/rest) page for more details and [comparison](/docs/developer/rest#inference-endpoint-comparison) with OpenAI-compatible endpoints.
---
###### LM Studio 0.3.29 • 2025‑10‑06
### OpenAI `/v1/responses` and variant listing
- New OpenAI‑compatible endpoint: `POST /v1/responses`.
- Stateful interactions via `previous_response_id`.
- Custom tool calling and Remote MCP support (opt‑in).
- Reasoning support with `reasoning.effort` for `openai/gpt‑oss‑20b`.
- Streaming via SSE when `stream: true`.
- CLI: `lms ls --variants` lists all variants for multi‑variant models.
- Docs: [/docs/developer/openai-compat](/docs/developer/openai-compat). Full release notes: [/blog/lmstudio-v0.3.29](/blog/lmstudio-v0.3.29).
---
###### LM Studio 0.3.27 • 2025‑09‑24
### CLI: model resource estimates, status, and interrupts
- New: `lms load --estimate-only
### Which mode should I choose?
#### `User`
Show only the chat interface, and auto-configure everything. This is the best choice for beginners or anyone who's happy with the default settings.
#### `Power User`
Use LM Studio in this mode if you want access to configurable [load](/docs/configuration/load) and [inference](/docs/configuration/inference) parameters as well as advanced chat features such as [insert, edit, & continue](/docs/advanced/context) (for either role, user or assistant).
#### `Developer`
Full access to all aspects in LM Studio. This includes keyboard shortcuts and development features. Check out the Developer section under Settings for more.
### Color Themes
> Customize LM Studio's color theme
### Selecting a Theme
Press `Cmd` + `K` then `T` (macOS) or `Ctrl` + `K` then `T` (Windows/Linux) to open the theme selector.
You can also choose a theme in the Settings tab (`Cmd` + `,` on macOS or `Ctrl` + `,` on Windows/Linux).
Choosing the "Auto" option will automatically switch between Light and Dark themes based on your system settings.
# developer
# LM Studio Developer Docs
> Build with LM Studio's local APIs and SDKs — TypeScript, Python, REST, and OpenAI‑compatible endpoints.
```lms_hstack
## Get to know the stack
- TypeScript SDK: [lmstudio-js](/docs/typescript)
- Python SDK: [lmstudio-python](/docs/python)
- LM Studio REST API: [Stateful Chats, MCPs via API](/docs/developer/rest)
- OpenAI‑compatible: [Chat, Responses, Embeddings](/docs/developer/openai-compat)
- LM Studio CLI: [`lms`](/docs/cli)
:::split:::
## What you can build
- Chat and text generation with streaming
- Tool calling and local agents with MCP
- Structured output (JSON schema)
- Embeddings and tokenization
- Model management (load, download, list)
```
## Super quick start
### TypeScript (`lmstudio-js`)
```bash
npm install @lmstudio/sdk
```
```ts
import { LMStudioClient } from "@lmstudio/sdk";
const client = new LMStudioClient();
const model = await client.llm.model("openai/gpt-oss-20b");
const result = await model.respond("Who are you, and what can you do?");
console.info(result.content);
```
Full docs: [lmstudio-js](/docs/typescript), Source: [GitHub](https://github.com/lmstudio-ai/lmstudio-js)
### Python (`lmstudio-python`)
```bash
pip install lmstudio
```
```python
import lmstudio as lms
with lms.Client() as client:
model = client.llm.model("openai/gpt-oss-20b")
result = model.respond("Who are you, and what can you do?")
print(result)
```
Full docs: [lmstudio-python](/docs/python), Source: [GitHub](https://github.com/lmstudio-ai/lmstudio-python)
### HTTP (LM Studio REST API)
```bash
lms server start --port 1234
```
```bash
curl http://localhost:1234/api/v1/chat \
-H "Content-Type: application/json" \
-H "Authorization: Bearer $LM_API_TOKEN" \
-d '{
"model": "openai/gpt-oss-20b",
"input": "Who are you, and what can you do?"
}'
```
Full docs: [LM Studio REST API](/docs/developer/rest)
## Helpful links
- [API Changelog](/docs/developer/api-changelog)
- [Local server basics](/docs/developer/core)
- [CLI reference](/docs/cli)
- [Discord Community](https://discord.gg/lmstudio)
## API Changelog
> Updates and changes to the LM Studio API.
---
###### LM Studio 0.4.0
### LM Studio native v1 REST API
- Official release of LM Studio's native v1 REST API at `/api/v1/*` endpoints.
- [MCP via API](/docs/developer/core/mcp)
- [Stateful chats](/docs/developer/rest/stateful-chats)
- [Authentication](/docs/developer/core/authentication) configuration with API tokens
- Model [download](/docs/developer/rest/download) and [load](/docs/developer/rest/load) endpoints
- See [overview](/docs/developer/rest) page for more details and [comparison](/docs/developer/rest#inference-endpoint-comparison) with OpenAI-compatible endpoints.
---
###### LM Studio 0.3.29 • 2025‑10‑06
### OpenAI `/v1/responses` and variant listing
- New OpenAI‑compatible endpoint: `POST /v1/responses`.
- Stateful interactions via `previous_response_id`.
- Custom tool calling and Remote MCP support (opt‑in).
- Reasoning support with `reasoning.effort` for `openai/gpt‑oss‑20b`.
- Streaming via SSE when `stream: true`.
- CLI: `lms ls --variants` lists all variants for multi‑variant models.
- Docs: [/docs/developer/openai-compat](/docs/developer/openai-compat). Full release notes: [/blog/lmstudio-v0.3.29](/blog/lmstudio-v0.3.29).
---
###### LM Studio 0.3.27 • 2025‑09‑24
### CLI: model resource estimates, status, and interrupts
- New: `lms load --estimate-only 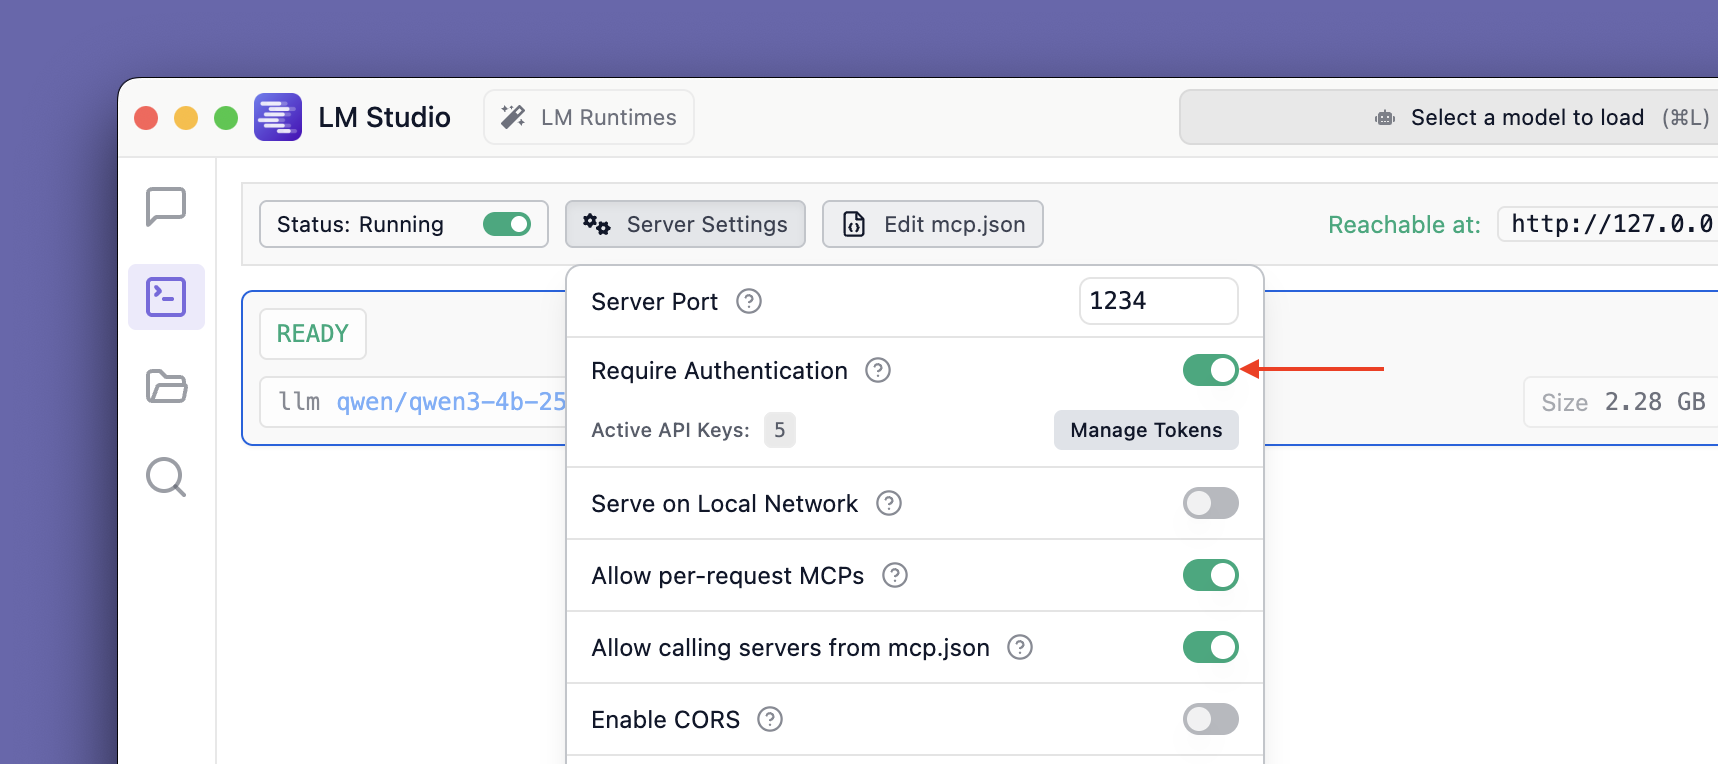
 ### Creating API Tokens
To create API Tokens, click on Manage Tokens in the Server Settings. It will open the API Tokens modal where you can create, view, and delete API Tokens.
### Creating API Tokens
To create API Tokens, click on Manage Tokens in the Server Settings. It will open the API Tokens modal where you can create, view, and delete API Tokens.
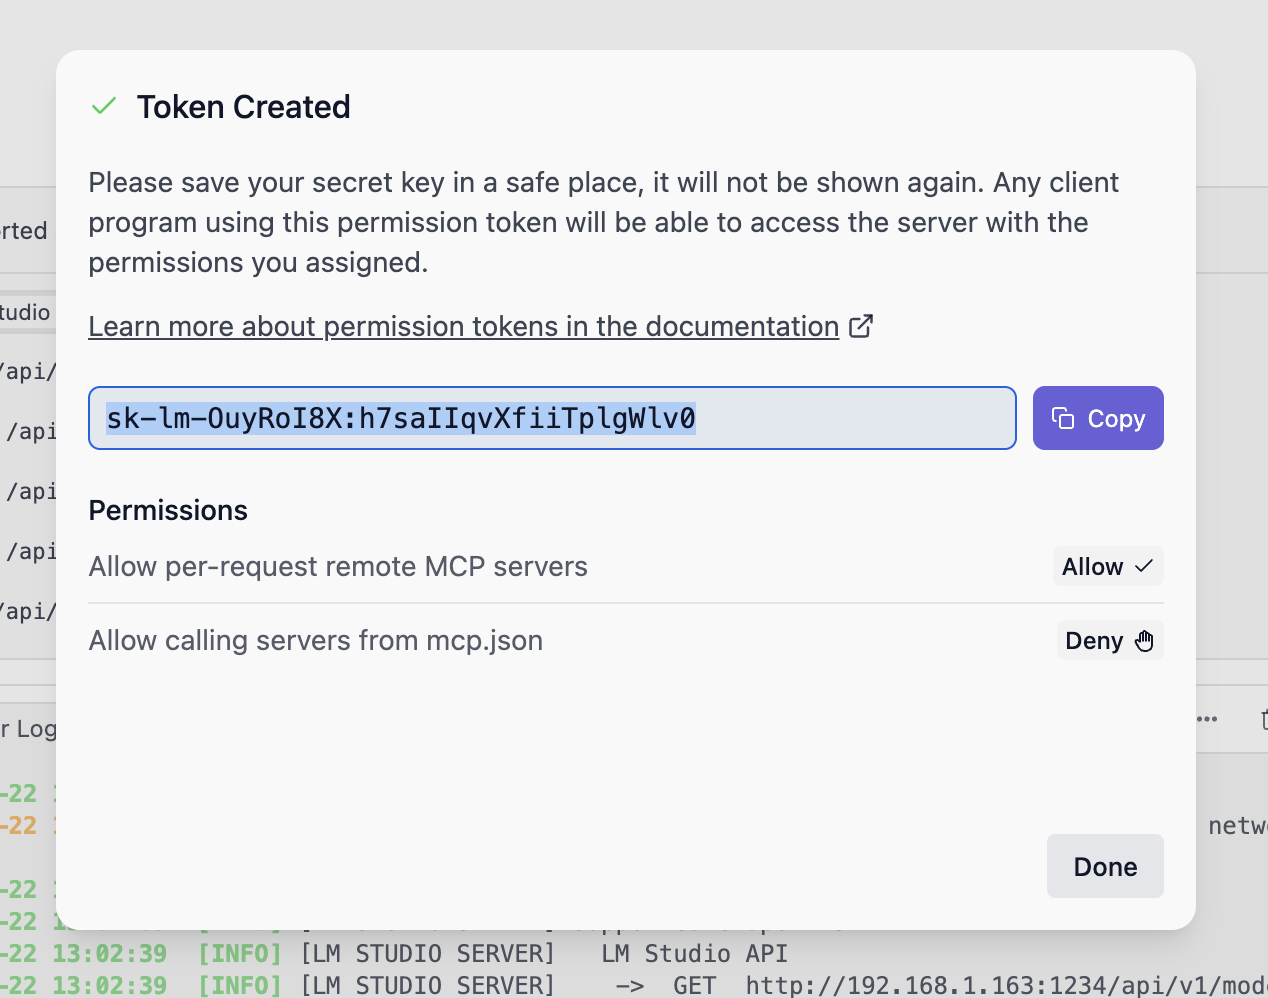
 Once created, make sure to copy the token as it will not be shown again.
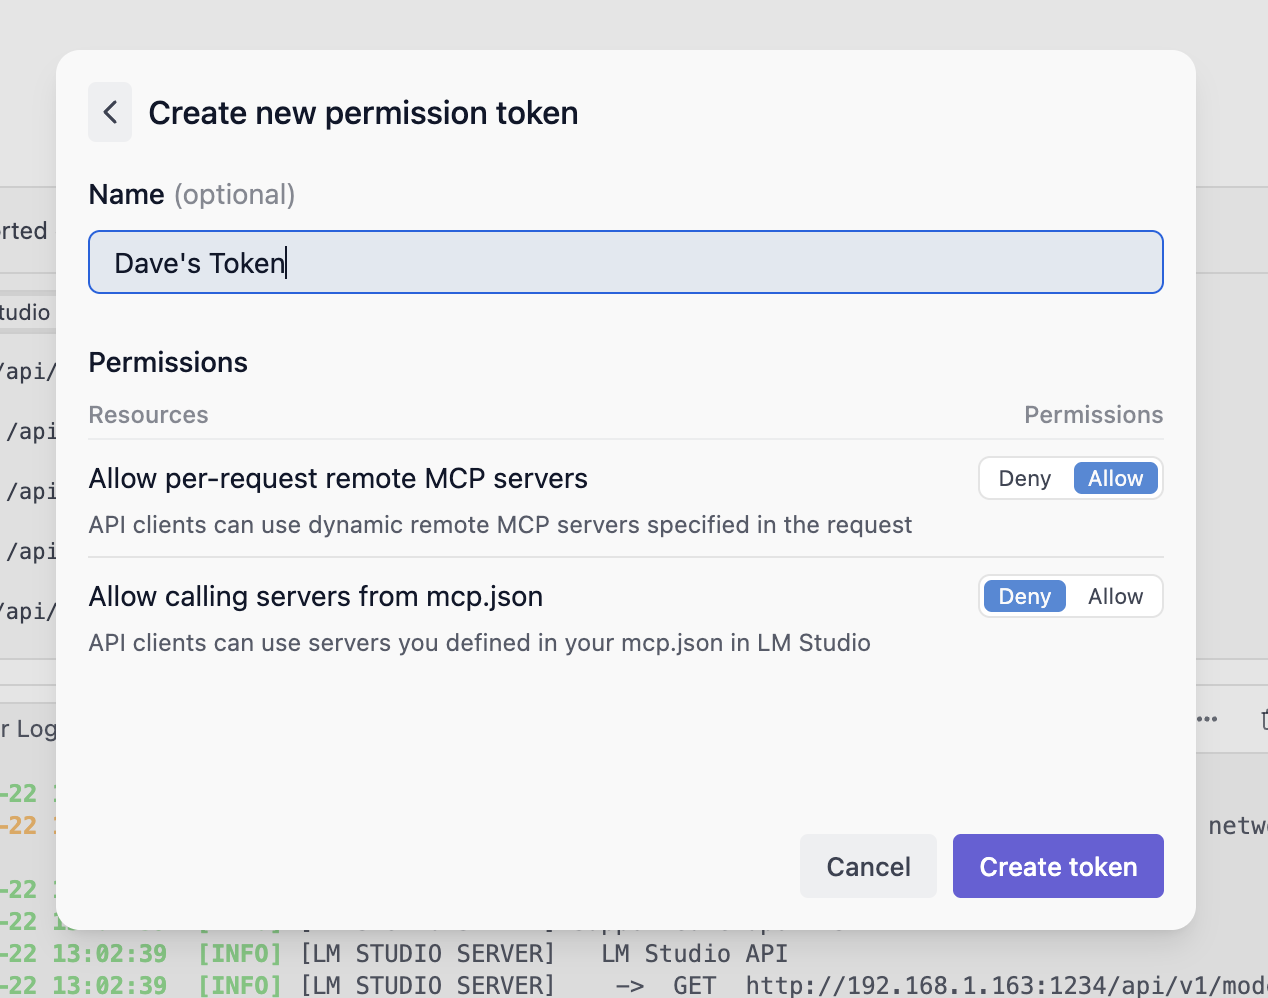
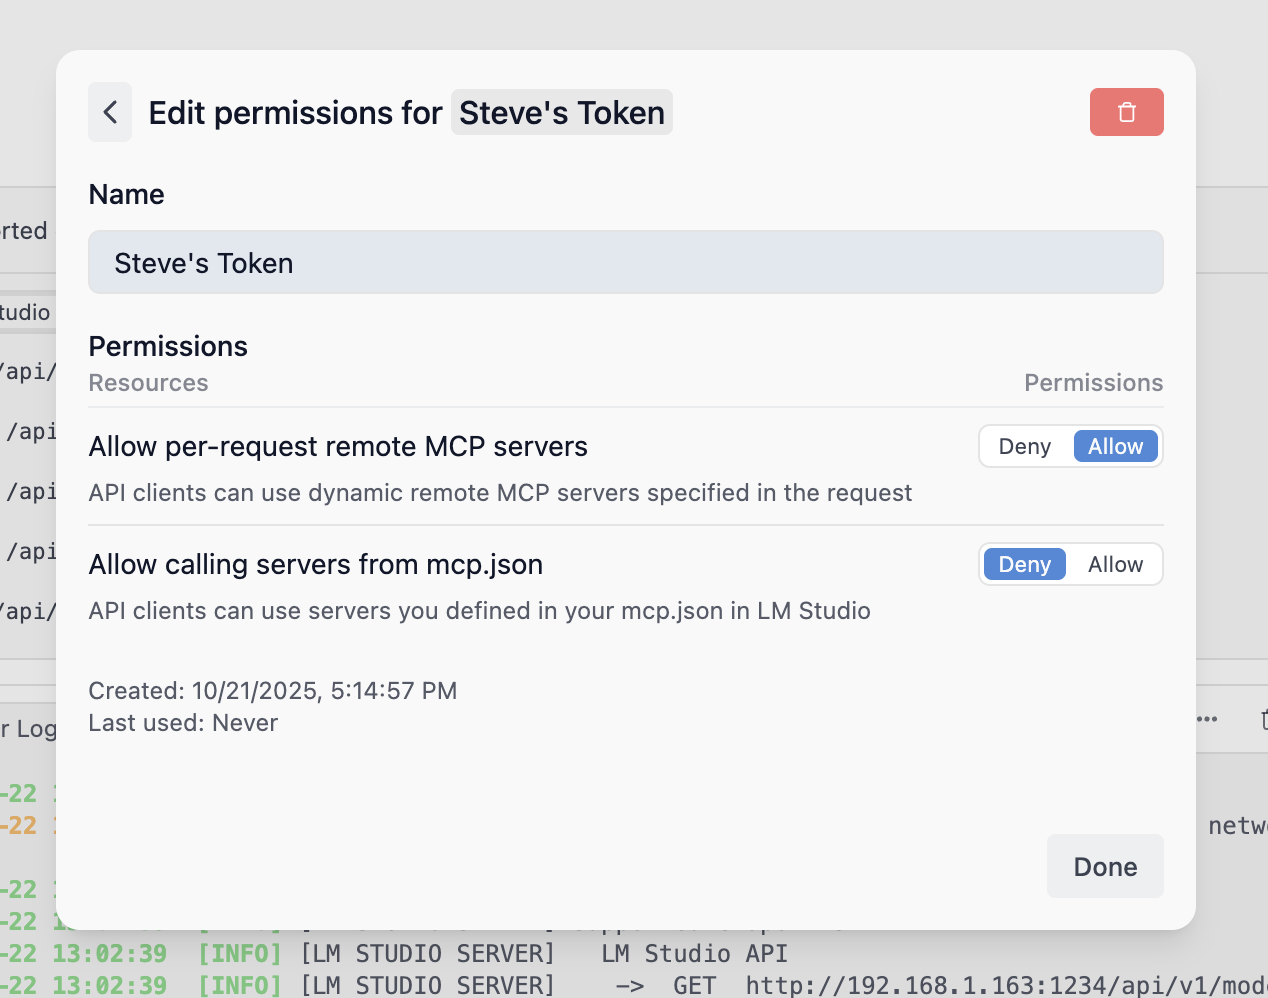
 ### Configuring API Token Permissions
To edit the permissions of an existing API Token, click on the Edit button next to the token in the API Tokens modal. You can modify the name and permissions of the token.
### Configuring API Token Permissions
To edit the permissions of an existing API Token, click on the Edit button next to the token in the API Tokens modal. You can modify the name and permissions of the token.
 ## API Token Usage
### Using API Tokens with REST API:
```lms_noticechill
The example below requires [allowing calling servers from mcp.json](/docs/developer/core/server/settings) to be enabled and the [tiktoken MCP](https://gitmcp.io/openai/tiktoken) in mcp.json.
```
```bash
curl -X POST \
http://localhost:1234/api/v1/chat \
-H "Authorization: Bearer $LM_API_TOKEN" \
-H "Content-Type: application/json" \
-d '{
"model": "ibm/granite-4-micro",
"input": "What is the first line in the tiktoken documentation?",
"integrations": [
{
"type": "plugin",
"id": "mcp/tiktoken",
"allowed_tools": [
"fetch_tiktoken_documentation"
]
}
]
}'
```
### Using API Tokens with Python SDK
To use API tokens with the Python SDK, see the [Python SDK guide](/docs/python/getting-started/authentication).
### Using API Tokens with TypeScript SDK
To use API tokens with the TypeScript SDK, see the [TS SDK guide](/docs/typescript/authentication).
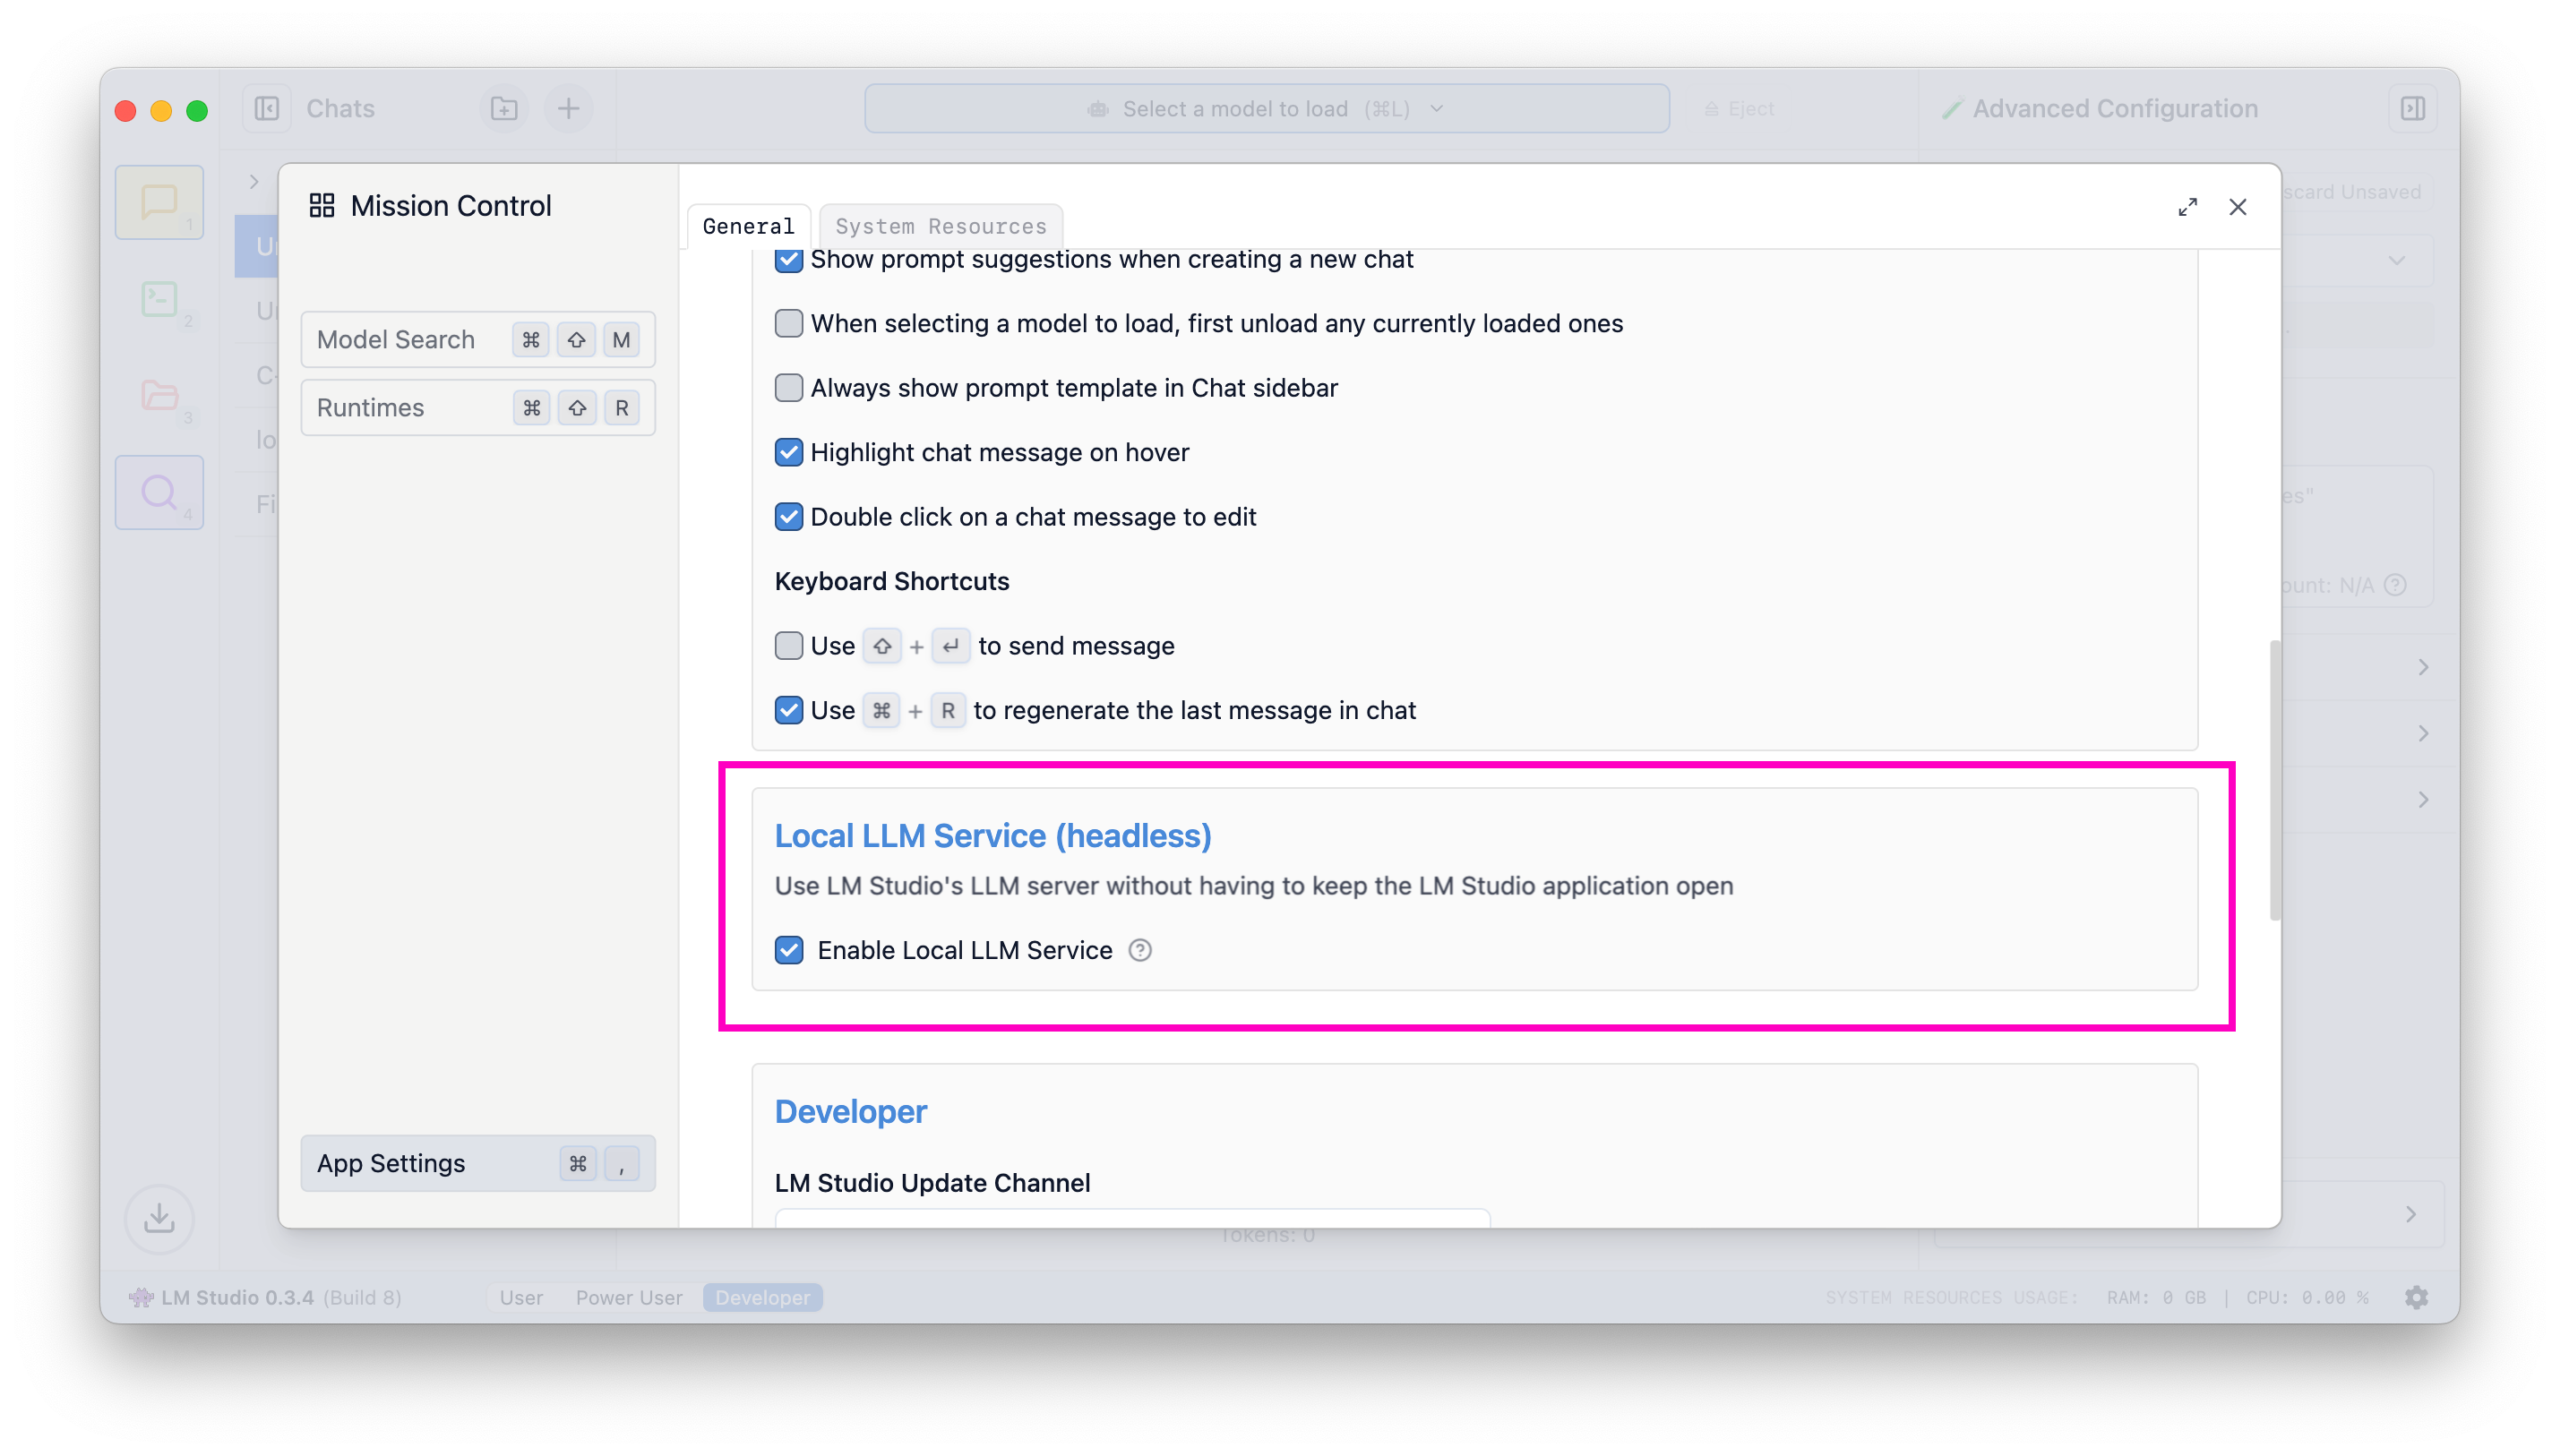
### Run LM Studio as a service (headless)
> GUI-less operation of LM Studio: run in the background, start on machine login, and load models on demand
LM Studio can be run as a service without the GUI. This is useful for running LM Studio on a server or in the background on your local machine. This works on Mac, Windows, and Linux machines with a graphical user interface.
## Run LM Studio as a service
Running LM Studio as a service consists of several new features intended to make it more efficient to use LM Studio as a developer tool.
1. The ability to run LM Studio without the GUI
2. The ability to start the LM Studio LLM server on machine login, headlessly
3. On-demand model loading
## Run the LLM service on machine login
To enable this, head to app settings (`Cmd` / `Ctrl` + `,`) and check the box to run the LLM server on login.
## API Token Usage
### Using API Tokens with REST API:
```lms_noticechill
The example below requires [allowing calling servers from mcp.json](/docs/developer/core/server/settings) to be enabled and the [tiktoken MCP](https://gitmcp.io/openai/tiktoken) in mcp.json.
```
```bash
curl -X POST \
http://localhost:1234/api/v1/chat \
-H "Authorization: Bearer $LM_API_TOKEN" \
-H "Content-Type: application/json" \
-d '{
"model": "ibm/granite-4-micro",
"input": "What is the first line in the tiktoken documentation?",
"integrations": [
{
"type": "plugin",
"id": "mcp/tiktoken",
"allowed_tools": [
"fetch_tiktoken_documentation"
]
}
]
}'
```
### Using API Tokens with Python SDK
To use API tokens with the Python SDK, see the [Python SDK guide](/docs/python/getting-started/authentication).
### Using API Tokens with TypeScript SDK
To use API tokens with the TypeScript SDK, see the [TS SDK guide](/docs/typescript/authentication).
### Run LM Studio as a service (headless)
> GUI-less operation of LM Studio: run in the background, start on machine login, and load models on demand
LM Studio can be run as a service without the GUI. This is useful for running LM Studio on a server or in the background on your local machine. This works on Mac, Windows, and Linux machines with a graphical user interface.
## Run LM Studio as a service
Running LM Studio as a service consists of several new features intended to make it more efficient to use LM Studio as a developer tool.
1. The ability to run LM Studio without the GUI
2. The ability to start the LM Studio LLM server on machine login, headlessly
3. On-demand model loading
## Run the LLM service on machine login
To enable this, head to app settings (`Cmd` / `Ctrl` + `,`) and check the box to run the LLM server on login.
 When this setting is enabled, exiting the app will minimize it to the system tray, and the LLM server will continue to run in the background.
## Just-In-Time (JIT) model loading for REST endpoints
Useful when utilizing LM Studio as an LLM service with other frontends or applications.
When this setting is enabled, exiting the app will minimize it to the system tray, and the LLM server will continue to run in the background.
## Just-In-Time (JIT) model loading for REST endpoints
Useful when utilizing LM Studio as an LLM service with other frontends or applications.
 #### When JIT loading is ON:
- Calls to OpenAI-compatible `/v1/models` will return all downloaded models, not only the ones loaded into memory
- Calls to inference endpoints will load the model into memory if it's not already loaded
#### When JIT loading is OFF:
- Calls to OpenAI-compatible `/v1/models` will return only the models loaded into memory
- You have to first load the model into memory before being able to use it
#### What about auto unloading?
JIT loaded models will be auto-unloaded from memory by default after a set period of inactivity ([learn more](/docs/developer/core/ttl-and-auto-evict)).
## Auto Server Start
Your last server state will be saved and restored on app or service launch.
To achieve this programmatically, you can use the following command:
```bash
lms server start
```
```lms_protip
If you haven't already, bootstrap `lms` on your machine by following the instructions [here](/docs/cli).
```
### Community
Chat with other LM Studio developers, discuss LLMs, hardware, and more on the [LM Studio Discord server](https://discord.gg/aPQfnNkxGC).
Please report bugs and issues in the [lmstudio-bug-tracker](https://github.com/lmstudio-ai/lmstudio-bug-tracker/issues) GitHub repository.
### Using MCP via API
> Learn how to use Model Control Protocol (MCP) servers with LM Studio API.
##### Requires [LM Studio 0.4.0](/download) or newer.
LM Studio supports Model Control Protocol (MCP) usage via API. MCP allows models to interact with external tools and services through standardized servers.
## How it works
MCP servers provide tools that models can call during chat requests. You can enable MCP servers in two ways: as ephemeral servers defined per-request, or as pre-configured servers in your `mcp.json` file.
## Ephemeral vs mcp.json servers
#### When JIT loading is ON:
- Calls to OpenAI-compatible `/v1/models` will return all downloaded models, not only the ones loaded into memory
- Calls to inference endpoints will load the model into memory if it's not already loaded
#### When JIT loading is OFF:
- Calls to OpenAI-compatible `/v1/models` will return only the models loaded into memory
- You have to first load the model into memory before being able to use it
#### What about auto unloading?
JIT loaded models will be auto-unloaded from memory by default after a set period of inactivity ([learn more](/docs/developer/core/ttl-and-auto-evict)).
## Auto Server Start
Your last server state will be saved and restored on app or service launch.
To achieve this programmatically, you can use the following command:
```bash
lms server start
```
```lms_protip
If you haven't already, bootstrap `lms` on your machine by following the instructions [here](/docs/cli).
```
### Community
Chat with other LM Studio developers, discuss LLMs, hardware, and more on the [LM Studio Discord server](https://discord.gg/aPQfnNkxGC).
Please report bugs and issues in the [lmstudio-bug-tracker](https://github.com/lmstudio-ai/lmstudio-bug-tracker/issues) GitHub repository.
### Using MCP via API
> Learn how to use Model Control Protocol (MCP) servers with LM Studio API.
##### Requires [LM Studio 0.4.0](/download) or newer.
LM Studio supports Model Control Protocol (MCP) usage via API. MCP allows models to interact with external tools and services through standardized servers.
## How it works
MCP servers provide tools that models can call during chat requests. You can enable MCP servers in two ways: as ephemeral servers defined per-request, or as pre-configured servers in your `mcp.json` file.
## Ephemeral vs mcp.json servers
| Feature | Ephemeral | mcp.json |
|---|---|---|
| How to specify in request | integrations -> "type": "ephemeral_mcp" |
integrations -> "type": "plugin" |
| Configuration | Only defined per-request | Pre-configured in mcp.json |
| Use case | One-off requests, remote MCP tool execution | MCP servers that require command, frequently used servers |
| Server ID | Specified via server_label in integration |
Specified via id (e.g., mcp/playwright) in integration |
| Custom headers | Supported via headers field |
Configured in mcp.json |
```lms_code_snippet
variants:
curl:
language: bash
code: |
curl http://localhost:1234/api/v1/chat \
-H "Authorization: Bearer $LM_API_TOKEN" \
-H "Content-Type: application/json" \
-d '{
"model": "ibm/granite-4-micro",
"input": "Open lmstudio.ai",
"integrations": ["mcp/playwright"],
"context_length": 8000,
"temperature": 0
}'
Python:
language: python
code: |
import os
import requests
import json
response = requests.post(
"http://localhost:1234/api/v1/chat",
headers={
"Authorization": f"Bearer {os.environ['LM_API_TOKEN']}",
"Content-Type": "application/json"
},
json={
"model": "ibm/granite-4-micro",
"input": "Open lmstudio.ai",
"integrations": ["mcp/playwright"],
"context_length": 8000,
"temperature": 0
}
)
print(json.dumps(response.json(), indent=2))
TypeScript:
language: typescript
code: |
const response = await fetch("http://localhost:1234/api/v1/chat", {
method: "POST",
headers: {
"Authorization": `Bearer ${process.env.LM_API_TOKEN}`,
"Content-Type": "application/json"
},
body: JSON.stringify({
model: "ibm/granite-4-micro",
input: "Open lmstudio.ai",
integrations: ["mcp/playwright"],
context_length: 8000,
temperature: 0
})
});
const data = await response.json();
console.log(data);
```
The response includes tool calls from the configured MCP server:
```lms_code_snippet
variants:
response:
language: json
code: |
{
"model_instance_id": "ibm/granite-4-micro",
"output": [
{
"type": "reasoning",
"content": "..."
},
{
"type": "message",
"content": "..."
},
{
"type": "tool_call",
"tool": "browser_navigate",
"arguments": {
"url": "https://www.youtube.com/watch?v=dQw4w9WgXcQ"
},
"output": "...",
"provider_info": {
"plugin_id": "mcp/playwright",
"type": "plugin"
}
},
{
"type": "reasoning",
"content": "..."
},
{
"type": "message",
"content": "The YouTube video page for ..."
}
],
"stats": {
"input_tokens": 2614,
"total_output_tokens": 594,
"reasoning_output_tokens": 389,
"tokens_per_second": 26.293245822877495,
"time_to_first_token_seconds": 0.154
},
"response_id": "resp_cdac6a9b5e2a40027112e441ce6189db18c9040f96736407"
}
```
## Restricting tool access
For both ephemeral and mcp.json servers, you can limit which tools the model can call using the `allowed_tools` field. This is useful if you do not want certain tools from an MCP server to be used, and can speed up prompt processing due to the model receiving fewer tool definitions.
```lms_code_snippet
variants:
curl:
language: bash
code: |
curl http://localhost:1234/api/v1/chat \
-H "Authorization: Bearer $LM_API_TOKEN" \
-H "Content-Type: application/json" \
-d '{
"model": "ibm/granite-4-micro",
"input": "What is the top trending model on hugging face?",
"integrations": [
{
"type": "ephemeral_mcp",
"server_label": "huggingface",
"server_url": "https://huggingface.co/mcp",
"allowed_tools": ["model_search"]
}
],
"context_length": 8000
}'
Python:
language: python
code: |
import os
import requests
import json
response = requests.post(
"http://localhost:1234/api/v1/chat",
headers={
"Authorization": f"Bearer {os.environ['LM_API_TOKEN']}",
"Content-Type": "application/json"
},
json={
"model": "ibm/granite-4-micro",
"input": "What is the top trending model on hugging face?",
"integrations": [
{
"type": "ephemeral_mcp",
"server_label": "huggingface",
"server_url": "https://huggingface.co/mcp",
"allowed_tools": ["model_search"]
}
],
"context_length": 8000
}
)
print(json.dumps(response.json(), indent=2))
TypeScript:
language: typescript
code: |
const response = await fetch("http://localhost:1234/api/v1/chat", {
method: "POST",
headers: {
"Authorization": `Bearer ${process.env.LM_API_TOKEN}`,
"Content-Type": "application/json"
},
body: JSON.stringify({
model: "ibm/granite-4-micro",
input: "What is the top trending model on hugging face?",
integrations: [
{
type: "ephemeral_mcp",
server_label: "huggingface",
server_url: "https://huggingface.co/mcp",
allowed_tools: ["model_search"]
}
],
context_length: 8000
})
});
const data = await response.json();
console.log(data);
```
If `allowed_tools` is not provided, all tools from the server are available to the model.
## Custom headers for ephemeral servers
When using ephemeral MCP servers that require authentication, you can pass custom headers:
```lms_code_snippet
variants:
curl:
language: bash
code: |
curl http://localhost:1234/api/v1/chat \
-H "Authorization: Bearer $LM_API_TOKEN" \
-H "Content-Type: application/json" \
-d '{
"model": "ibm/granite-4-micro",
"input": "Give me details about my SUPER-SECRET-PRIVATE Hugging face model",
"integrations": [
{
"type": "ephemeral_mcp",
"server_label": "huggingface",
"server_url": "https://huggingface.co/mcp",
"allowed_tools": ["model_search"],
"headers": {
"Authorization": "Bearer 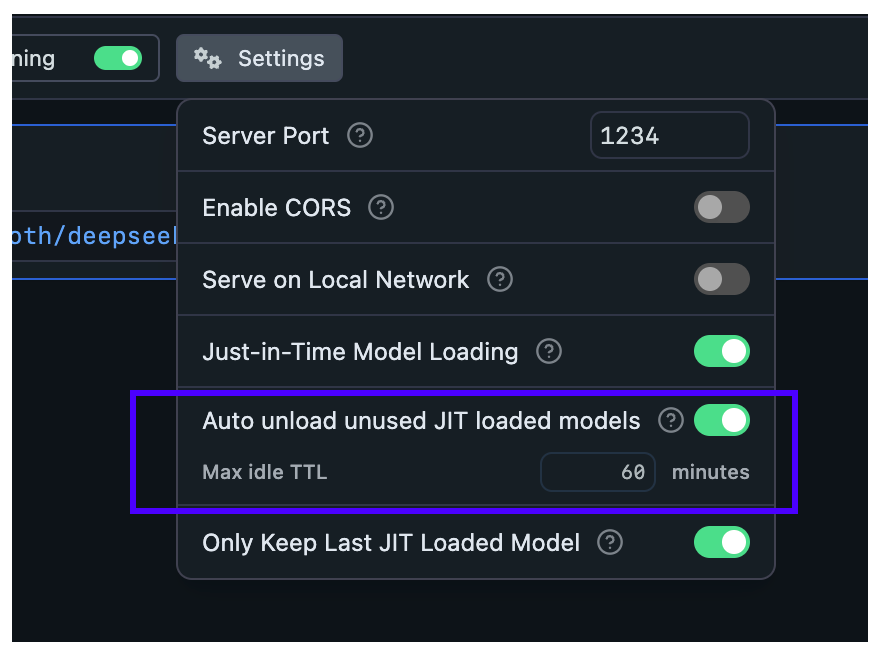 ### Set per-model TTL-model in API requests
When JIT loading is enabled, the **first request** to a model will load it into memory. You can specify a TTL for that model in the request payload.
This works for requests targeting both the [OpenAI compatibility API](/docs/developer/openai-api) and the [LM Studio's REST API](/docs/developer/rest):
```diff
curl http://localhost:1234/api/v0/chat/completions \
-H "Content-Type: application/json" \
-d '{
"model": "deepseek-r1-distill-qwen-7b",
+ "ttl": 300,
"messages": [ ... ]
}'
```
###### This will set a TTL of 5 minutes (300 seconds) for this model if it is JIT loaded.
### Set TTL for models loaded with `lms`
By default, models loaded with `lms load` do not have a TTL, and will remain loaded in memory until you manually unload them.
You can set a TTL for a model loaded with `lms` like so:
```bash
lms load
### Set per-model TTL-model in API requests
When JIT loading is enabled, the **first request** to a model will load it into memory. You can specify a TTL for that model in the request payload.
This works for requests targeting both the [OpenAI compatibility API](/docs/developer/openai-api) and the [LM Studio's REST API](/docs/developer/rest):
```diff
curl http://localhost:1234/api/v0/chat/completions \
-H "Content-Type: application/json" \
-d '{
"model": "deepseek-r1-distill-qwen-7b",
+ "ttl": 300,
"messages": [ ... ]
}'
```
###### This will set a TTL of 5 minutes (300 seconds) for this model if it is JIT loaded.
### Set TTL for models loaded with `lms`
By default, models loaded with `lms load` do not have a TTL, and will remain loaded in memory until you manually unload them.
You can set a TTL for a model loaded with `lms` like so:
```bash
lms load 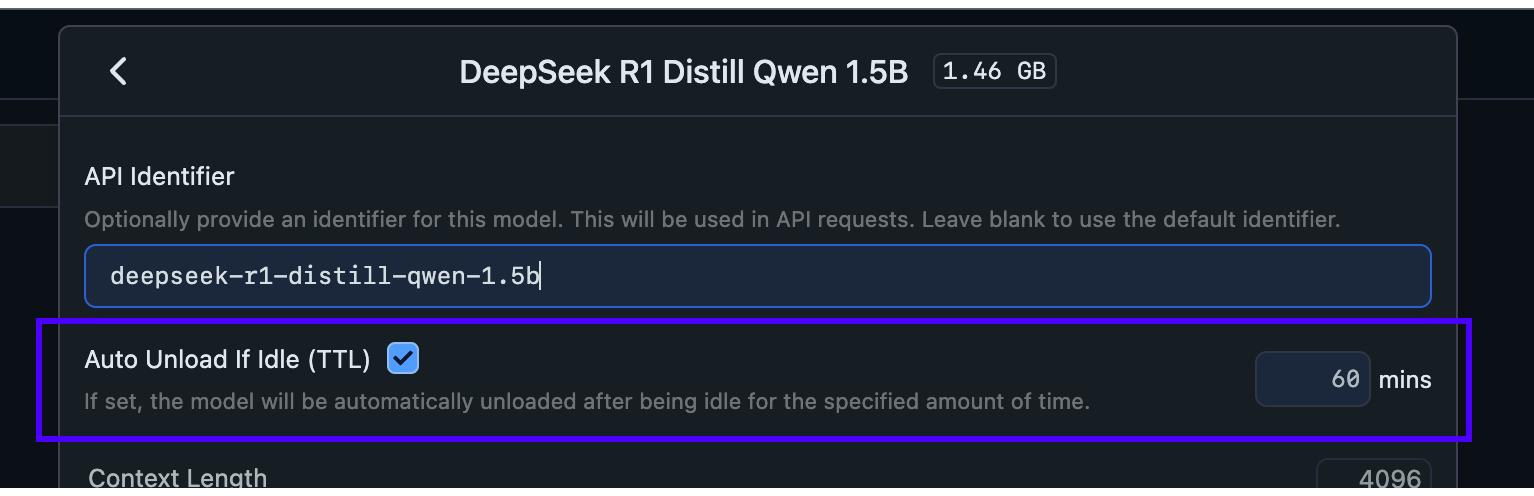 ## Configure Auto-Evict for JIT loaded models
With this setting, you can ensure new models loaded via JIT automatically unload previously loaded models first.
This is useful when you want to switch between models from another app without worrying about memory building up with unused models.
## Configure Auto-Evict for JIT loaded models
With this setting, you can ensure new models loaded via JIT automatically unload previously loaded models first.
This is useful when you want to switch between models from another app without worrying about memory building up with unused models.
 **When Auto-Evict is ON** (default):
- At most `1` model is kept loaded in memory at a time (when loaded via JIT)
- Non-JIT loaded models are not affected
**When Auto-Evict is OFF**:
- Switching models from an external app will keep previous models loaded in memory
- Models will remain loaded until either:
- Their TTL expires
- You manually unload them
This feature works in tandem with TTL to provide better memory management for your workflow.
### Nomenclature
`TTL`: Time-To-Live, is a term borrowed from networking protocols and cache systems. It defines how long a resource can remain allocated before it's considered stale and evicted.
### server
### LM Studio as a Local LLM API Server
> Run an LLM API server on `localhost` with LM Studio
You can serve local LLMs from LM Studio's Developer tab, either on `localhost` or on the network.
LM Studio's APIs can be used through [REST API](/docs/developer/rest), client libraries like [lmstudio-js](/docs/typescript) and [lmstudio-python](/docs/python), and [OpenAI compatibility endpoints](/docs/developer/openai-compat)
**When Auto-Evict is ON** (default):
- At most `1` model is kept loaded in memory at a time (when loaded via JIT)
- Non-JIT loaded models are not affected
**When Auto-Evict is OFF**:
- Switching models from an external app will keep previous models loaded in memory
- Models will remain loaded until either:
- Their TTL expires
- You manually unload them
This feature works in tandem with TTL to provide better memory management for your workflow.
### Nomenclature
`TTL`: Time-To-Live, is a term borrowed from networking protocols and cache systems. It defines how long a resource can remain allocated before it's considered stale and evicted.
### server
### LM Studio as a Local LLM API Server
> Run an LLM API server on `localhost` with LM Studio
You can serve local LLMs from LM Studio's Developer tab, either on `localhost` or on the network.
LM Studio's APIs can be used through [REST API](/docs/developer/rest), client libraries like [lmstudio-js](/docs/typescript) and [lmstudio-python](/docs/python), and [OpenAI compatibility endpoints](/docs/developer/openai-compat)
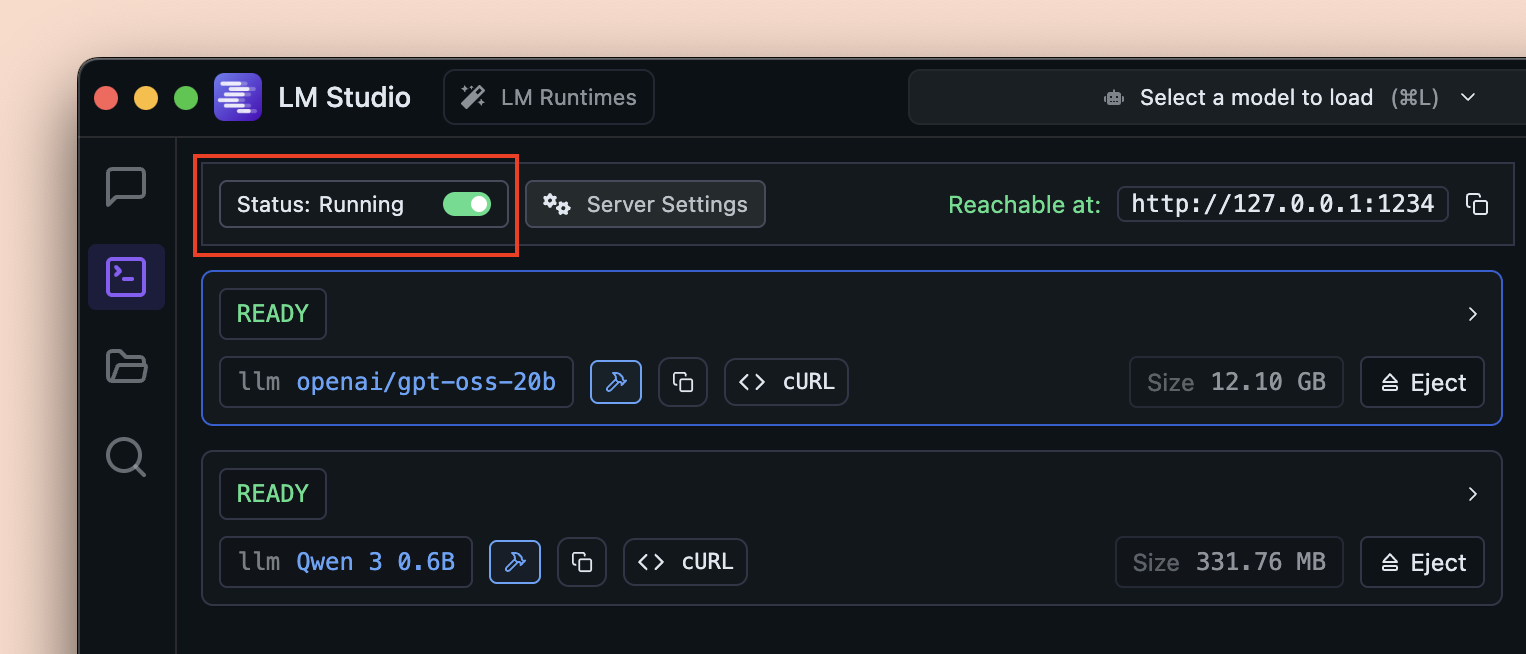
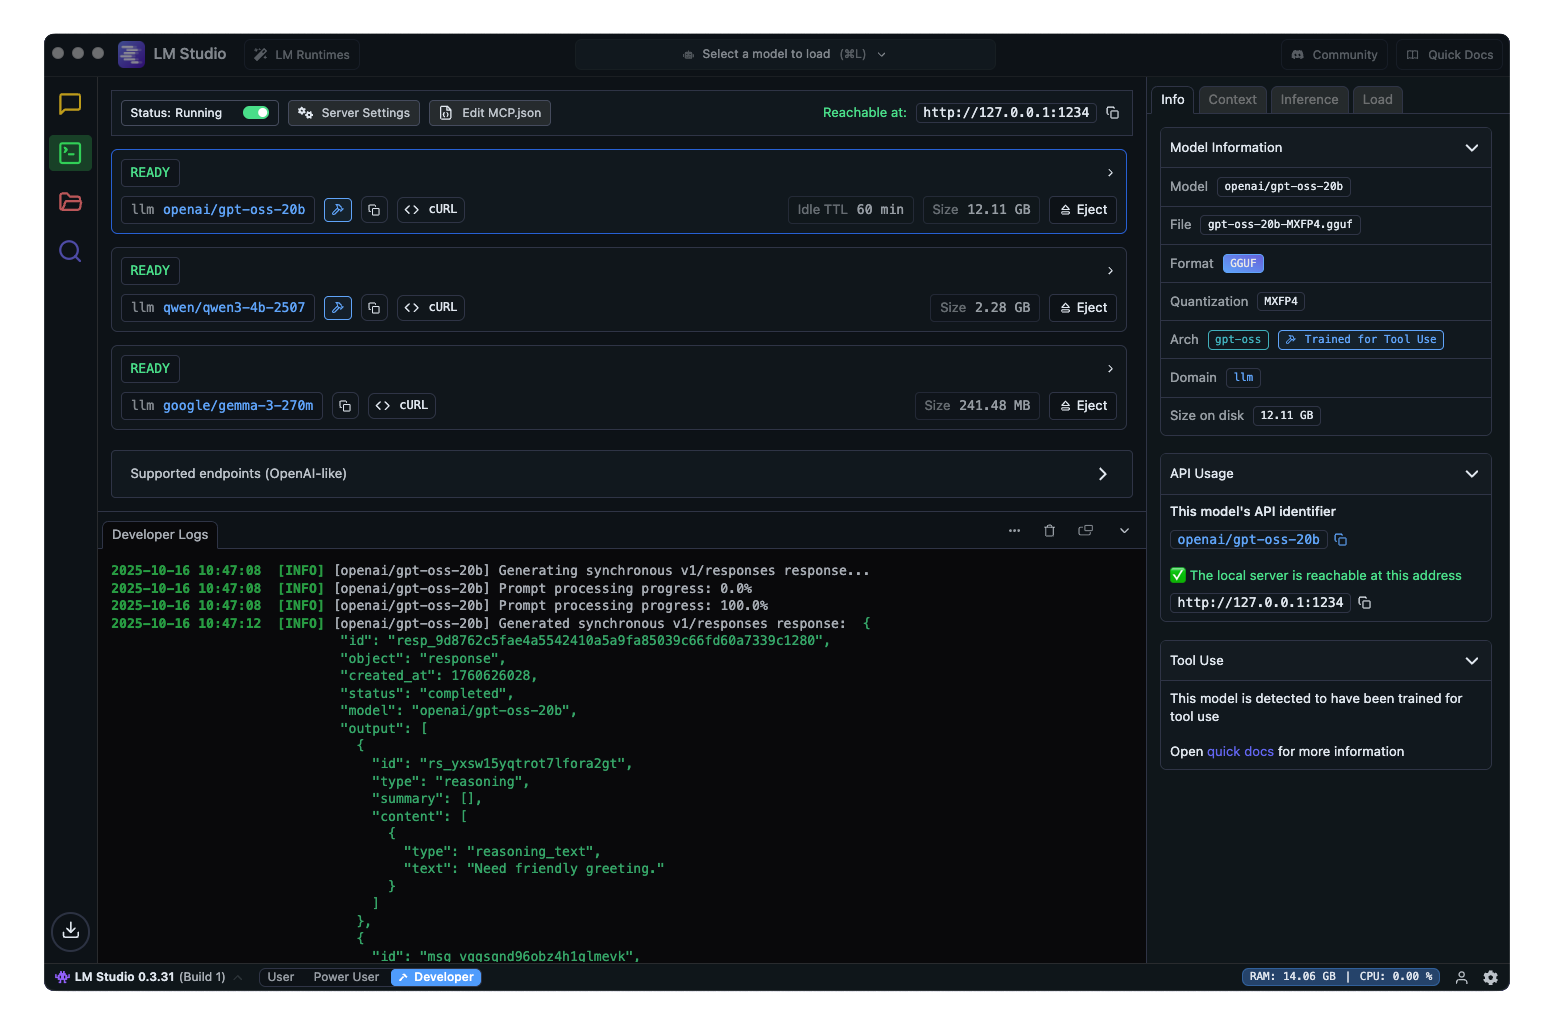 ### Running the server
To run the server, go to the Developer tab in LM Studio, and toggle the "Start server" switch to start the API server.
### Running the server
To run the server, go to the Developer tab in LM Studio, and toggle the "Start server" switch to start the API server.
 Alternatively, you can use `lms` ([LM Studio's CLI](/docs/cli)) to start the server from your terminal:
```bash
lms server start
```
### API options
- [LM Studio REST API](/docs/developer/rest)
- [TypeScript SDK](/docs/typescript) - `lmstudio-js`
- [Python SDK](/docs/python) - `lmstudio-python`
- [OpenAI compatibility endpoints](/docs/developer/openai-compat)
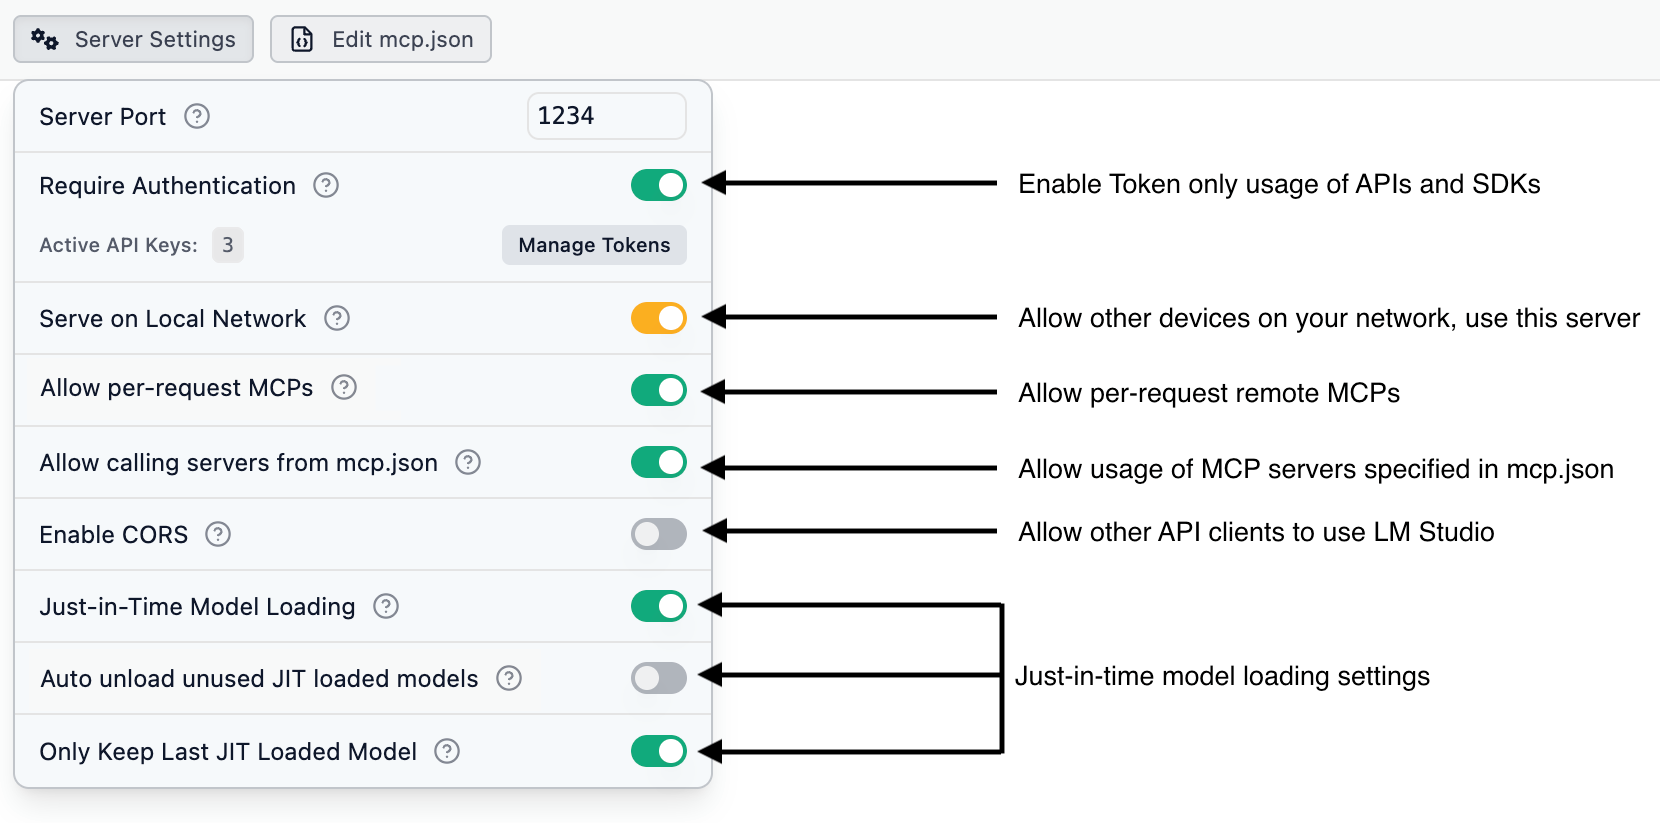
#### Server Settings
> Configure server settings for LM Studio API Server
You can configure server settings, such as the port number, whether to allow other API clients to access the server and MCP features.
Alternatively, you can use `lms` ([LM Studio's CLI](/docs/cli)) to start the server from your terminal:
```bash
lms server start
```
### API options
- [LM Studio REST API](/docs/developer/rest)
- [TypeScript SDK](/docs/typescript) - `lmstudio-js`
- [Python SDK](/docs/python) - `lmstudio-python`
- [OpenAI compatibility endpoints](/docs/developer/openai-compat)
#### Server Settings
> Configure server settings for LM Studio API Server
You can configure server settings, such as the port number, whether to allow other API clients to access the server and MCP features.
 ### Settings information
```lms_params
- name: Server Port
type: Integer
optional: false
description: Port number on which the LM Studio API server listens for incoming connections.
unstyledName: true
- name: Require Authentication
type: Switch
description: Require API clients to provide a valid API token via the `Authorization` header. Learn more in the [Authentication](/docs/developer/core/authentication) section.
unstyledName: true
- name: Serve on Local Network
type: Switch
description: Allow other devices on the same local network to access the API server. Learn more in the [Serve on Local Network](/docs/developer/core/server/serve-on-network) section.
unstyledName: true
- name: Allow per-request MCPs
type: Switch
description: Allow API clients to use MCP (Model Control Protocol) servers that are not in your mcp.json. These MCP connections are ephemeral, only existing as long as the request. At the moment, only remote MCPs are supported.
unstyledName: true
- name: Allow calling servers from mcp.json
type: Switch
description: Allow API clients to use servers you defined in your mcp.json in LM Studio. This can be a security risk if you've defined MCP servers that have access to your file system or private data. This option requires "Require Authentication" to be enabled.
unstyledName: true
- name: Enable CORS
type: Switch
description: Enable Cross-Origin Resource Sharing (CORS) to allow applications from different origins to access the API.
unstyledName: true
- name: Just in Time Model Loading
type: Switch
description: Load models dynamically at request time to save memory.
unstyledName: true
- name: Auto Unload Unused JIT Models
type: Switch
description: Automatically unload JIT-loaded models from memory when they are no longer in use.
unstyledName: true
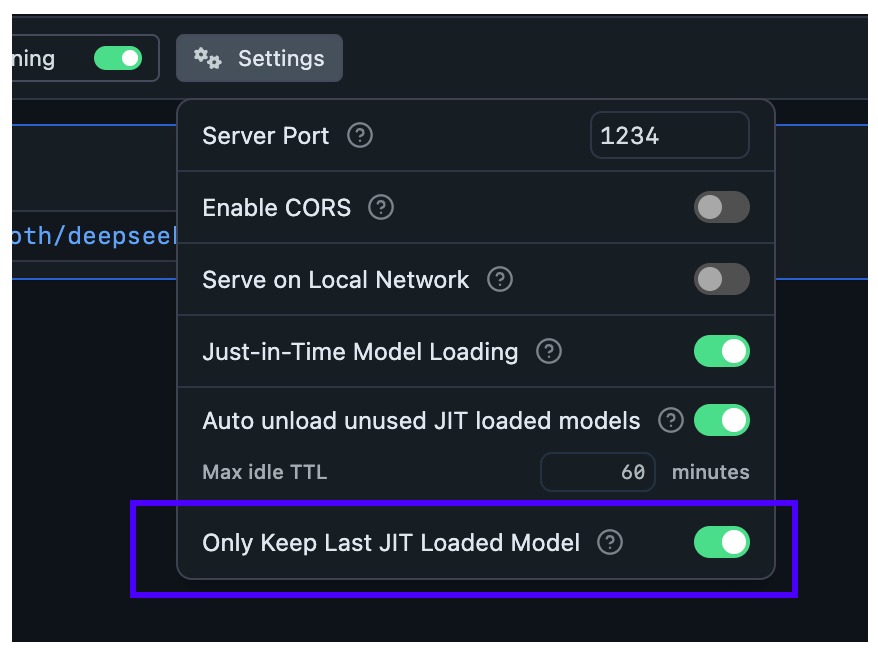
- name: Only Keep Last JIT Loaded Model
type: Switch
description: Keep only the most recently used JIT-loaded model in memory to minimize RAM usag
unstyledName: true
```
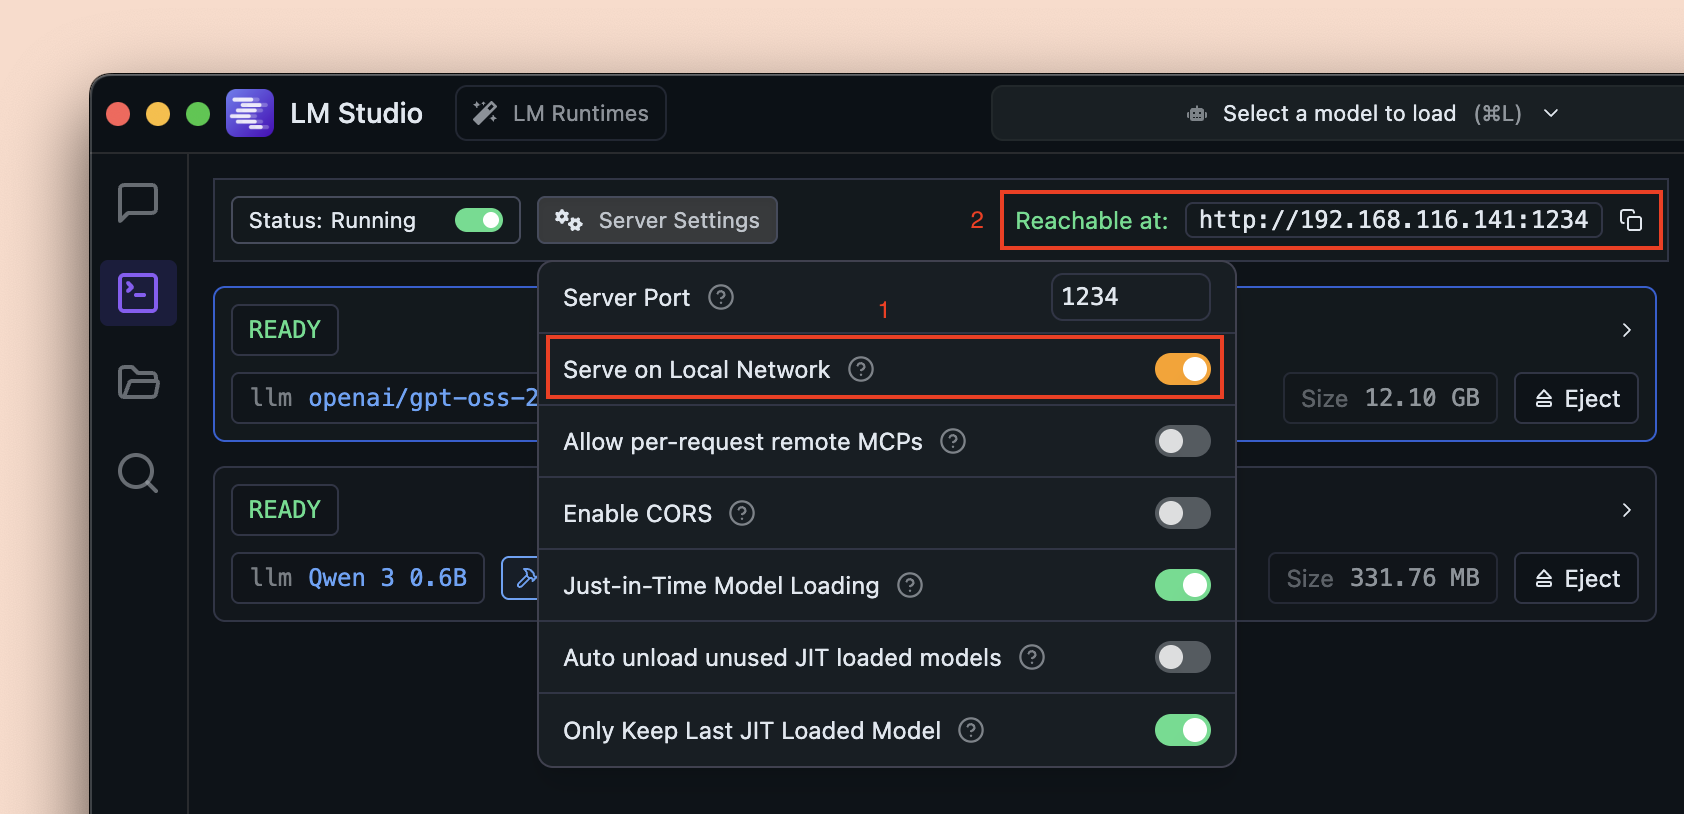
#### Serve on Local Network
> Allow other devices in your network use this LM Studio API server
Enabling the "Serve on Local Network" option allows the LM Studio API server running on your machine to be accessible by other devices connected to the same local network.
This is useful for scenarios where you want to:
- Use a local LLM on your other less powerful devices by connecting them to a more powerful machine running LM Studio.
- Let multiple people use a single LM Studio instance on the network.
- Use the API from IoT devices, edge computing units, or other services in your local setup.
Once enabled, the server will bind to your local network IP address instead of localhost. The API access URL will be updated accordingly which you can use in your applications.
### Settings information
```lms_params
- name: Server Port
type: Integer
optional: false
description: Port number on which the LM Studio API server listens for incoming connections.
unstyledName: true
- name: Require Authentication
type: Switch
description: Require API clients to provide a valid API token via the `Authorization` header. Learn more in the [Authentication](/docs/developer/core/authentication) section.
unstyledName: true
- name: Serve on Local Network
type: Switch
description: Allow other devices on the same local network to access the API server. Learn more in the [Serve on Local Network](/docs/developer/core/server/serve-on-network) section.
unstyledName: true
- name: Allow per-request MCPs
type: Switch
description: Allow API clients to use MCP (Model Control Protocol) servers that are not in your mcp.json. These MCP connections are ephemeral, only existing as long as the request. At the moment, only remote MCPs are supported.
unstyledName: true
- name: Allow calling servers from mcp.json
type: Switch
description: Allow API clients to use servers you defined in your mcp.json in LM Studio. This can be a security risk if you've defined MCP servers that have access to your file system or private data. This option requires "Require Authentication" to be enabled.
unstyledName: true
- name: Enable CORS
type: Switch
description: Enable Cross-Origin Resource Sharing (CORS) to allow applications from different origins to access the API.
unstyledName: true
- name: Just in Time Model Loading
type: Switch
description: Load models dynamically at request time to save memory.
unstyledName: true
- name: Auto Unload Unused JIT Models
type: Switch
description: Automatically unload JIT-loaded models from memory when they are no longer in use.
unstyledName: true
- name: Only Keep Last JIT Loaded Model
type: Switch
description: Keep only the most recently used JIT-loaded model in memory to minimize RAM usag
unstyledName: true
```
#### Serve on Local Network
> Allow other devices in your network use this LM Studio API server
Enabling the "Serve on Local Network" option allows the LM Studio API server running on your machine to be accessible by other devices connected to the same local network.
This is useful for scenarios where you want to:
- Use a local LLM on your other less powerful devices by connecting them to a more powerful machine running LM Studio.
- Let multiple people use a single LM Studio instance on the network.
- Use the API from IoT devices, edge computing units, or other services in your local setup.
Once enabled, the server will bind to your local network IP address instead of localhost. The API access URL will be updated accordingly which you can use in your applications.
 ## rest
## LM Studio API
> LM Studio's REST API for local inference and model management
LM Studio offers a powerful REST API with first-class support for local inference and model management. In addition to our native API, we provide full OpenAI compatibility mode ([learn more](/docs/developer/openai-compat)).
## What's new
Previously, there was a [v0 REST API](/docs/developer/rest/endpoints). That API has since been deprecated in favor of the v1 REST API.
The v1 REST API includes enhanced features such as:
- [MCP via API](/docs/developer/core/mcp)
- [Stateful chats](/docs/developer/rest/stateful-chats)
- [Authentication](/docs/developer/core/authentication) configuration with API tokens
- Model [download](/docs/developer/rest/download) and [load](/docs/developer/rest/load) endpoints
## Supported endpoints
The following endpoints are available in LM Studio's v1 REST API.
## rest
## LM Studio API
> LM Studio's REST API for local inference and model management
LM Studio offers a powerful REST API with first-class support for local inference and model management. In addition to our native API, we provide full OpenAI compatibility mode ([learn more](/docs/developer/openai-compat)).
## What's new
Previously, there was a [v0 REST API](/docs/developer/rest/endpoints). That API has since been deprecated in favor of the v1 REST API.
The v1 REST API includes enhanced features such as:
- [MCP via API](/docs/developer/core/mcp)
- [Stateful chats](/docs/developer/rest/stateful-chats)
- [Authentication](/docs/developer/core/authentication) configuration with API tokens
- Model [download](/docs/developer/rest/download) and [load](/docs/developer/rest/load) endpoints
## Supported endpoints
The following endpoints are available in LM Studio's v1 REST API.
| Endpoint | Method | Docs |
|---|---|---|
/api/v1/chat |
Chat | |
/api/v1/models |
List Models | |
/api/v1/models/load |
Load | |
/api/v1/models/download |
Download | |
/api/v1/models/download/status |
Download Status |
| Feature | /api/v1/chat |
/v1/responses |
/v1/chat/completions |
|---|---|---|---|
| Stateful chat | ✅ | ✅ | ❌ |
| Remote MCPs | ✅ | ✅ | ❌ |
| MCPs you have in LM Studio | ✅ | ✅ | ❌ |
| Custom tools | ❌ | ✅ | ✅ |
| Model load streaming events | ✅ | ❌ | ❌ |
| Prompt processing streaming events | ✅ | ❌ | ❌ |
| Specify context length in the request | ✅ | ❌ | ❌ |